Автор: Abhi
Источник: http://www.dotnetfunda.com/
WPF introduces Device Independent DPI Settings for the applications built with it. For a window, it is very important to calculate how much Dots Per inch(DPI) the screen could draw. This is generally dependent on the hardware device and operating system in which the application runs and also how the DPI settings is applied on the Device. Any user can easily customize these settings and hence make the application look horrible. Windows forms application uses pixel based approach so with changing DPI settings, each control will change its size and look. WPF addresses this issue and makes it independent of DPI settings of the computer. Lets look how its possible :

Let say you have drawn a box, just like one in the figure, which is 1 inch long in 96 dpi screen. Now if you see the same application in 120 dpi settings the box will appear smaller. This is because the things that we see on the screen are totally dependent on dpi settings. In case of WPF, this is modified to density based approach. That means when the density of pixel is modified, the elements will adjust them accordingly and hence the pixel of WPF application is Device Independent Pixel. As you can see in the figure, the size of the control remains same in case of WPF application and it takes more pixel in case of 120 DPI application to adjust the size properly.
Built-In Support for Graphics and Animation
WPF applications as being rendered within DirectX environment, it has major support of graphics and animation capabilities. A separate sets of classes are there which specifically deals with animation effects and graphics. The graphics that you draw over the screen is also Vector based and are object oriented. That means, when you draw a rectangle in WPF application, you can easily remove that from the screen as rectangle is actually an object which you always have hold on. On traditional Windows based application, once you draw a rectangle, you cant select that individually. Thus programming approach in case of WPF is completely different and more sophisticated than traditional graphics approach. We will discuss graphics and animation in more detail in later section of the article.
Redefine Styles and Control Templates
In addition to graphics and animation capabilities, WPF also comes with a huge flexibility to define the styles and ControlTemplates. Style based technique as you might come across with CSS are a set of definitions which defines how the controls will look like when it is rendered on the screen. In case of traditional windows applications, styles are tightly coupled with each controls, so that you need to define color, style etc for each individual control to make it look differently. In case of WPF, Styles are completely separated from the UIElement. Once you define a style, you can change the look and feel of any control by just putting the style on the element. Most of the UIElements that we generally deal with is actually made using more than one individual elements. WPF introduces a new concept of Templates, which you might use to redefine the whole control itself. Say for instance, you have a CheckBox, which has a Rectangle in it and a ContentPresenter (one where the caption of the TextBox appears). Thus you can redefine your checkbox and put a ToggleButton inside it, so that the check will appear on the ToggleButton rather than on the Rectangle. This is very interesting. We will look into more detail on Styles and ControlTemplates in later section of the article.
Resource based Approach for every control:
Another important feature of WPF is Resource based approach. In case of traditional windows applications, defining styles is very hectic. So if you have 1000 buttons, and you want to apply Color to each Buttons to Gold, you need to create 1000 objects of Color and assign each to one individual elements. Thus it makes it very resource hungry. In WPF, you can store styles, controls, animations, and even any object as resource. Thus each resource will be declared once when the form loads itself, and you may associate them to the controls. You can maintain a full hierarchy of styles in separate file called ResourceDictionary, from which styles for the whole application will be applied. Thus WPF application could be themed very easily.
New Property System & Binding Capabilities
In the next step, I must introduce the new property system introduced with WPF. Every element of WPF defines a large number of dependency properties. The dependency properties have strong capabilities than the normal properties. Thus when I define our new property, we can easily register my own property to any object I wish to. It will add up to the same observer that is associated to every object. As every element is derived from DependencyObject in its object hierarchy, each of them contains the Dependency Observer. Once you register a variable as Dependency property, it will create a room on the observer associated with that control and set the value there. We will discuss in more detail in later sections of the series.
What is XAML ?
According to definition, XAML is an XML based markup language for specifying and setting the characteristics of classes. In other words, XAML is a language used by WPF, silverlight or any other application which can declare classes by itself. So, you can declare a variable, define the properties of any class and directly use it in your application. The XAML parser will automatically parse and create the actual object while it renders the application. XAML is generally used to define layout of UI, its elements and objects for static and visual aspect. We cannot define flow of a program using XAML. So even though there is large capabilities of XAML, it is actually not a programming language, rather it is used to design UI of the application. Thus XAML employs other programming languages like C#, VB.NET etc to define the logic in code behind. ExpressionBuilder is the best tool to generate XAML.
WPF Architecture
For every new technology, it is very essential to have clear idea about its architecture. So before beginning
your application you must grab a few concepts. If you dont like to know WPF in detail, please skip this
section. As mentioned earlier, WPF is actually a set of assemblies that build up the entire framework.
These assemblies can be categorized as
• Managed Layer
• UnManaged Layer
• Core API
Managed Layer : Managed layer of WPF is built using a number of assemblies. These assemblies build
up the WPF framework, communicates with lower level unmanaged API to render its content. The few
assemblies that comprise the WPF framework are :
• PresentationFramework.dll : Creates the top level elements like layout panels, controls, windows,
styles etc.
• PresentationCore.dll : It holds base types such as UIElement, Visual from which all shapes and
controls are Derived in PresentationFramework.dll.
• WindowsBase.dll : They hold even more basic elements which are capable to be used outside the
WPF environment like Dispatcher object, Dependency Objects. I will discuss each of them later.
Library Core. It basically translates the WPF higher level objects like layout panels, buttons, animation etc into textures that Direct3D expects. It is the main rendering engine of WPF. WindowsCodecs.dll : This is another low level API which is used for imaging support in WPF applications. WindowsCodecs.dll comprises of a number of codecs which encodes / decodes images into vector graphics that would be rendered into WPF screen. Direct3D : It is the low level API in which the graphics of WPF is rendered. User32 : It is the primary core api which every program uses. It actually manages memory and process separation. GDI & Device Drivers : GDI and Device Drivers are specific to the operating system which is also used from the application to access low level APIs.
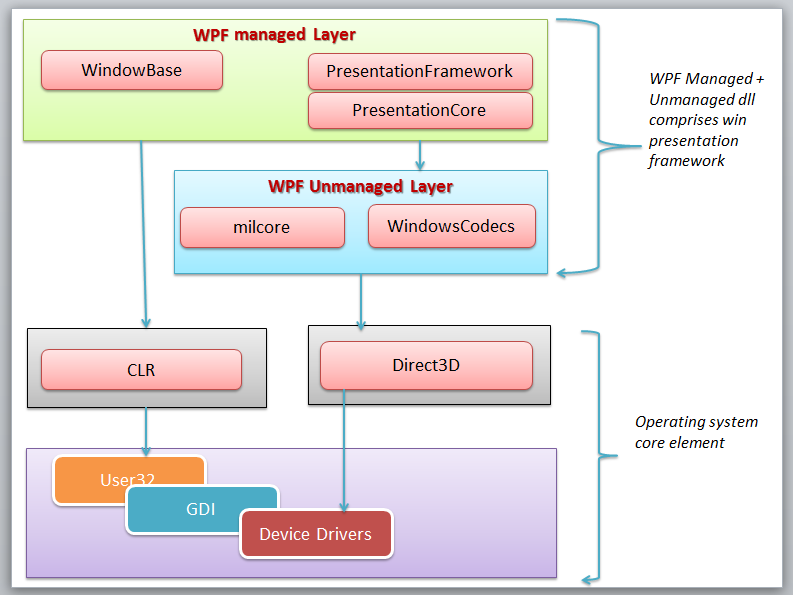
In the above figure, you can see how different framework elements communicates between one another that I have just discussed.
Few things to Know before you proceed
There are quite a few things that you must know before starting with WPF applications. What is meant by Dispatcher & Thread Affinity? When WPF application starts, it actually creates two threads automatically. One is Rendering Thread, which is hidden from the programmer, so you cannot use the rendering thread directly from your program; while the other is Dispatcher Thread, which actually holds all the UI elements. So in other words, you might say Dispatcher is actually the UI thread which ties all the elements created within the WPF application. Conversely, WPF requires all the UI elements to be tied with Dispatcher thread, this is called Thread Affinity. Thus you cannot change any element created on Dispatcher thread from any other threads, thus it follows the same Win32 based API’s. Thus it allows you to inter-operate any WPF component into HWND based API.
Dispatcher is a class that handles thread affinity. It is actually a prioritized message loop through which all elements are channeled through. Every UIElement is derived from DispatcherObject which defines a property called Dispatcher which points to the UI thread. Thus from any other thread, if you want to invoke or access UI component, you need to Invoke using Dispatcher thread. DispatcherObject actually has two chief duties, to check and verify if the thread has access to the object. What is Visual Tree and Logical Tree? Every programming style contains some sort of LogicalTree which comprises the Overall Program. The LogicalTree comprises the elements as they are listed in XAML. Thus they will only include the controls that you have declared in you XAML. VisualTree on the other hand, comprises the parts that make up the individual controls. You do not generally need to deal with VisualTree directly, but you should know how each control is comprises of, so it would be easier to build custom templates using this.
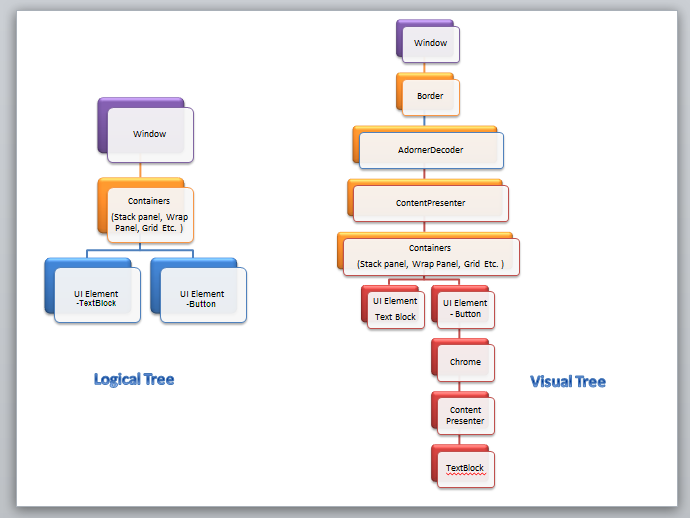
What is Visual Tree and Logical Tree?
Every programming style contains some sort of LogicalTree which comprises the Overall Program. The
LogicalTree comprises the elements as they are listed in XAML. Thus they will only include the controls
that you have declared in you XAML.
VisualTree on the other hand, comprises the parts that make up the individual controls. You do not
generally need to deal with VisualTree directly, but you should know how each control is comprises of, so
it would be easier to build custom templates using this.
Why RoutedEvent ?
RoutedEvent is very new to C# language, but those who are coming from javascript/web tech, you
would have found it in your browser. Actually there are two types of RoutedEvent. One which Bubbles
through the Visual tree elements and other which Tunnels through the visual tree elements. There is also
Direct RoutedEvent which does not Bubble or Tunnel.
When a Routed event which is registered, is invoked, it Bubbles / Tunnels through the Visual Elements
and calls all the Registered RoutedEventHandlers associated within the Visual Tree one by one.
To discriminate between the two, WPF demarcated events with Preview*** as the events which are
Tunneled and just *** for the events that Bubbles. For instance IsPreviewMouseDown is the event that
tunnels through the Visual Child elements while MouseDown Bubbles. Thus Mouse Down of the Outermost
element is called first in case of IsPreviewMouseDown while Mouse Down for the innermost element will
be called first in case of MouseDown event
Why DependencyObject is Used ?
Every WPF control is derived from DependaecyObject. DependencyObject is a class that supports
DependencyProperty, a property system that is newly built in WPF. Every object is derived from DependencyObject
and hence it can associate itself in various inbuilt features of WPF like EventTriggers, PropertyBindings,
Animations etc.
Every DependencyObject actually has an Observer or a List and declares 3 methods called ClearValue,
SetValue and GetValue which are used to add/edit/remove those properties. Thus the DependencyProperty
will only create itself when you use SetValue to store something. Thus it is resource saving as well. We
will look DependencyProperty in detail on other articles of the Series.
What about Hardware Acceleration and Graphics Rendering Tiers in WPF ?
Another important thing that you should know is how the WPF graphics is rendered. Actually WPF
rendering automatically detects how much hardware acceleration is supported by the current system and
adjusts itself accordingly. The graphics rendering detects the appropriate tier for rendering the output
accordingly.
For hardware Rendering few things that has most of the impact are :
• Video RAM : This determines the size and number of buffers that the application might use to render
its output.
• Pixel Shader : It is a graphics utility which calculates effects on per pixel basis
• Vertex Shader : It is a graphics processing utility that performs mathematical calculations on Vertex
of the output. They are used to add special effects to objects in 3D environment.
• MultiTexture Blending : This is a special function that allows you to apply two or more textures on
the same object in 3D.
Now the rendering engine of WPF determines which tier is appropriate for the current application and
apply the rendering tiers accordingly.
• TIER 0 : No graphics hardware acceleration takes place, rather everything is rendered using Software.
Any version of DirectX 9 or less is capable of rendering this output.
• TIER 1 : Partial hardware and software rendering. You might use Directx9 or greater to use this tier.
• TIER 2 : Full hardware acceleration. Directx9 or above can render this output.
Object Hierarchy

There are quite a few objects in any control of WPF. Lets discuss one by one as in figure. (The abstract
class is marked in ellipse while concrete class in Rectangles) :
• DispatcherObject : Mother of all WPF controls which takes care of UI thread.
• DependencyObject : Builds the Observer for Dependency Properties.
• Visual : Links between managed libraries and milcore.
• UIElement : Adds supports for WPF features like layout, input, events etc.
• FrameworkElement : Implementation of UIElement
• Shape : Base class of all the Basic Shapes
• Control : The UI elements that interact with the user. They can be Templated to change look.
• ContentControl : Baseclass of all controls that has single content.
• ItemsControl : Baseclass for all controls that shows a collection
• Panel : Baseclass of all panels which shows one or more cont/rols within it