Introduction
PCs come with an amazingly powerful device: a graphics processing unit (GPU). It is mostly underutilized, often doing little more than rendering a desktop to the user. But computing on the GPU is refreshingly fast compared to conventional CPU processing whenever significant portions of your program can be run in parallel. The applications are seemingly endless including: matrix computations, signal transformations, random number generation, molecular modeling, and password recovery. Why are GPUs are so effective? They have hundreds, in some cases thousands, of cores available for parallel processing. Compare this to the typical one to four CPU cores on today's PCs. (For a more technical treatment see: graphics.stanford.edu/~mhouston/public_talks/cs448-gpgpu.pdf
Here I present a way to use the power of NVidia's CUDA-enabled GPUs for computing using Java and an Eclipse-based IDE. My platform is Linux Mint 13 (64 and 32 bit), but the process can be reproduced on many other Linux distributions and can be adapted (by a resourceful reader) to a Windows install.
Background
Easily accessing the power of the GPU for general purpose computing requires a GPU programming utility that exposes a set of high-level methods and does all of the granular, hardware-level work for us. The popular choices are OpenGl and CUDA. CUDA works only with NVIDIA GPUs. I use NVIDIA devices and this article presents a CUDA solution.
Eclipse is my favourite IDE for programming in Java, C++, and PHP. NVIDIA provides an Eclipse-based IDE, named Night, which is preconfigured for CUDA C++ development. Other features, like Java, PHP, etc., can be added to your Nsight installation from any available Eclipse software repository.
Direct programming with CUDA requires using unmanaged C++ code. I prefer programming with managed code. To do this I use a method for wrapping the C++ functionality of CUDA in bindings that are accessible to Java. In the past, on a Windows 7 platform, I wrote my own wrappers for use with C#.net code. With Java, this is not necessary because open source wrappers are available. I use JCuda.
There are four basic elements presented here:
- Determining if you have a compatible GPU
- Installing/configuring CUDA
- Configuring Nsight for Java
- Utilizing JCuda
Sometimes tutorials present steps that the writer followed on an existing production machine that already had certain prerequisite configurations in place. Consequently, when a reader follows the steps, the procedure may fail. To avoid this, I tested the process described below from a fresh install of Mint 13_64 bit and a separate, fresh install of Linux Mint 13_32 bit. I chose the Mate flavour in both cases. Here are the details of my demonstration machines:
- GeForce GTX 560 Ti GPU (My 32 bit install has a Quadro NVS 160M GPU)
- Fully updated (with update manager)
- Added gedit for convenience
- Only in special cases (see later): Installed the standard, proprietary, Nvidia driver through Menu > All > Additional drivers.;
Just a note
Computationally intensive applications, e.g. Fourier transforms, whether they are done on the CPU or the GPU, will give your system a stress test. Start small and monitor system temperatures when you have high computational overhead.
Setup
Step 1: Do you have a compatible GPU?
NVidia has an exhaustive list of CUDA-compatible GPUs on their Developer Zone web site: http://developer.nvidia.com/cuda-gpus. Check to see if yours is listed. Stop if it isn't and look into an OpenGL approach.
Step 2: Install dependencies:
There are some prerequisites. From a terminal, run the following commands to get them:
- sudo apt-get update
- sudo apt-get install freeglut3-dev build-essential libx11-dev libxmu-dev libxi-dev libgl1-mesa-glx libglu1-mesa libglu1-mesa-dev gcc
Step 3: Download the CUDA Production Release and install
Download the latest CUDA release from: https://developer.nvidia.com/cuda-downloads. (Note: Mint 13 is based on Ubuntu 12.04. The CUDA download page currently does not show Ubuntu 12.04 in the list for Linux downloads but the one for Ubuntu 11.10 works fine.)
Split the installer into its three component installer scripts: toolkit, driver, and samples. This fine-grained control is a great benefit if/when troubles occur. Here is the syntax for splitting the installer.
- sh cuda_5.0.35_linux_64_ubuntu11.10-1.run -extract=
The following three files are created:
- cudatoolkit_5.0.35_linux_64_ubuntu11.10.run (or cudatoolkit_5.0.35_linux_32_ubuntu11.10.run)
- devdriver_5.0_linux_64_304.54.run (or devdriver_5.0_linux_32_304.54.run)
- cuda-samples_5.0.35_linux.run
We start by installing the NVidia developer driver. Before you do anything; print this page, save your work, and be sure you are backed-up.
You cannot have an X server running when you install the developer drivers. Do a preliminary test to make sure you can drop to a console and stop your X server. First try the mainstream method: [ctrl]+[alt]+[f2]. If you are lucky your desktop shows a console prompting you to login. If so, login and type sudo service mdm stop. (Note: other Linux distros use a different display managers, e.g. gdm, lightdm, etc.) You will see a blank screen. Do [ctrl]+[alt]+[f2] again. You should now see the console. Reboot or run startx.
If [ctrl]+[alt]+[f2] did not work (e.g. your system hangs), reboot and install the standard NVidia Driver from the Additional Drivers menu item (even though the next step will remove them). After this, [ctrl]+[alt]+[f2] should work.
Next, edit your blacklist configuration file (gksu gedit /etc/modprobe.d/blacklist.conf) and add these lines to the end:
- blacklist amd76x_edac
- blacklist vga16fb
- blacklist nouveau
- blacklist rivafb
- blacklist nvidiafb
- blacklist rivatv
Then, remove everything nvidia from aptitude: sudo apt-get remove --purge nvidia*
Drop to a console ([ctrl]+[alt]+[f2]), exit the X server, and run the installer: sudo sh devdriver_5.0_linux_64_304.54.run (or sudo sh devdriver_5.0_linux_32_304.54.run)
- Read/accept EULA
- At question: "register kernel module sources with DKMS", I said YES.
- At question (64 bit only): "Install 32-bit OpenGl compatibility", I said NO.
- At question: "run the nvidia-xconfig utility", I said YES.
- (One early trial install asked me if I wanted the installer to hack nouveau off my system. I said yes and it worked for me.)
Reboot or startx.
Next, install the toolkit with: sudo sh cudatoolkit_5.0.35_linux_64_ubuntu11.10.run (or sudo sh cudatoolkit_5.0.35_linux_32_ubuntu11.10.run)
Your toolkit install console will present the following text when it is complete:
- Please make sure your PATH includes /usr/local/cuda-5.0/bin
- Please make sure your LD_LIBRARY_PATH
- for 32-bit Linux distributions includes /usr/local/cuda-5.0/lib
- for 64-bit Linux distributions includes /usr/local/cuda-5.0/lib64:/usr/local/cuda-5.0/lib
- OR
- for 32-bit Linux distributions add /usr/local/cuda-5.0/lib
- for 64-bit Linux distributions add /usr/local/cuda-5.0/lib64 and /usr/local/cuda-5.0/lib
- to /etc/ld.so.conf and run ldconfig as root
Save time and frustration
Set your additional paths persistently by editing (creating if necessary) the .profile file in your home directory. Add PATH=$PATH:/usr/local/cuda-5.0/bin to the end of the file, save, then logout and login.
Use a persistent, modular approach for managing your LD_LIBRARY_PATH. I never edit the /etc/ld.so.conf file. Rather, my ld.so.conf file contains the line: include /etc/ld.so.conf.d/*.conf. I create a new file in the /etc/ld.so.conf.d folder named cuda.conf that has the following line(s):
- /usr/local/cuda-5.0/lib
- /usr/local/cuda-5.0/lib64 (64 bit installs only)
Then run sudo ldconfig.
Step 4: Test CUDA Using NVidia CUDA Samples
Install the samples by running your third, split-out installer script: sudo sh cuda-samples_5.0.35_linux.run
Now let's run a test. From a terminal, change to the folder where the deviceQuery sample is located (default is /usr/local/cuda-5.0/samples/1_Utilities/deviceQuery). Make the sample with the system compiler: sudo make. Then, run the sample: ./deviceQuery. I see the following on my 64 bit test system:
	/usr/local/cuda-5.0/samples/1_Utilities/deviceQuery $ .
	/deviceQuery ./deviceQuery Starting...
	CUDA Device Query (Runtime API) version (CUDART static linking)
	Detected 1 CUDA Capable device(s)
	Device 0: "GeForce GTX 560 Ti"
	etc., etc., ...
	Runtime Version = 5.0, NumDevs = 1, Device0 = GeForce GTX 560 T
Step 5: Start the Nsight Eclipse edition
Nsight is a fork of Eclipse that is pre-configured for C++ and CUDA. It is included in your toolkit install (you already have it). For now, run it from a terminal: /usr/local/cuda-5.0/libnsight/nsight. (Do not double-click the file from your file manager.) Later you can make a desktop launcher. Go ahead and choose the default folder for projects that it recommends.
Let's test it.
- File > New > Cuda C++ Project
- Pick Import Cuda Sample
- Name the project test
- Click Next
- In the samples list pick Bandwidth Test
- Click Next
- Basic settings - use defaults
- Click Finish
- From the Project menu: Project > Build Project
- From the Run menu: Run > Run
My output in the console window is:
	[CUDA Bandwidth Test] - Starting...
	Running on..Device 0:
	GeForce GTX 560 Ti.
	etc., ...
Step 6: Configure Nsight for Java Development
Nsight can be expanded through Help>Install New Software. To add Java development, you need to add http://download.eclipse.org/releases/indigo to your Available Software Sites. Then, install Eclipse Java Development Tools.
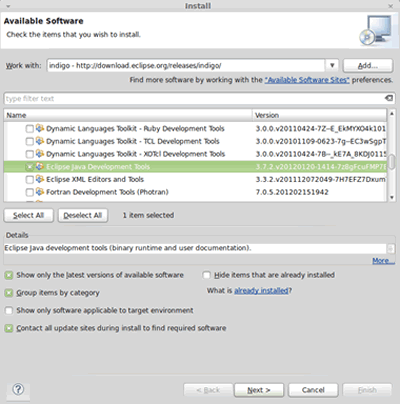
Follow the install dialog and restart Nsight.
Step 7: Download and Get Started with the JCuda Bindings
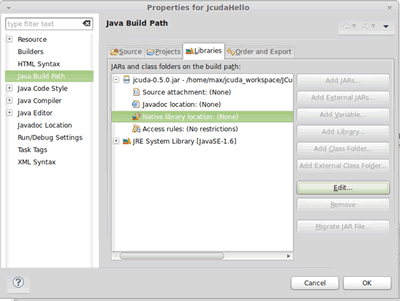
Download the zip for your platform from http://www.jcuda.org/downloads/downloads.html. Extract it to a folder in your home directory. Then start Nsight. Create a new Java Project (File > New > Java Project) and name it JCudaHello. Right-click the JCudaHello project in the project explorer and select Properties. Go to the Java Build Path tree item and select the Libraries tab. Click Add External Jars, navigate to the extracted folder you created, and pick jcuda-0.5.0.jar. With the Libraries tab still open, expand the tree for the jcuda-0.5.0.jar you added and click on Native library location (none). Then click the Edit button. You will be asked for a location. Click External Folder and again navigate to the extracted folder. Click OK.
Now, right-click your src folder in the jcudaHello project from the Project Explorer and select New > Class. Name the class cudaTest and select the public static void main method stub:

Click Finish. Delete the code that is pre-generated in cudaTest.java from the editor pane and paste this in:
import jcuda.Pointer;
	import jcuda.runtime.JCuda;
	public class test {
	public static
	void main(String[] args) {
		Pointer pointer = new Pointer();
		JCuda.cudaMalloc(pointer, 4);
		System.out.println("Pointer: " + pointer);
		JCuda.cudaFree(pointer);
	}
}
When you run it, you should see something like this:
	Pointer:
	Pointer[nativePointer=0x800100000,byteOffset=0]
Using the project code
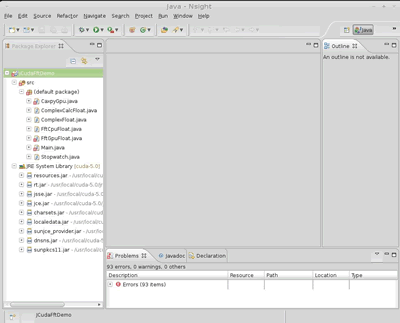
The project code is a zipped Eclipse workspace that does not include any hidden meta-data folders or information files. When you unzip it to your location of choice, you will see two sub-directories: JCudaFftDemo and Notes.
First, we need to create an Nsight Java project from the existing sources in the JcudaFftDemo folder. Start Nsight and choose your extracted directory (parent directory for JcudaFftDemo) when it asks you to select a workspace. Create a new Java Project from the File menu and give it the exact name: JCudaFftDemo. Then, click Finish. If you expand the trees for the project in the Project Explorer you should see:
Next, you need to add the JCuda binaries to the Java Build Path. Right-click the JCudaFftDemo project in the Project Explorer and select Properties. Go to the Java Build Path tree item and select the Libraries tab. Click Add External Jars, navigate to the JCuda binaries you downloaded in Setup – Step 7, and pick jcuda-0.5.0.jar, jcublas-0.5.0.jar, and jcufft-0.5.0.jar. With the Libraries tab still open, one at a time, expand the trees for the jars you added and click on Native library location (none). Click the Edit button and set the location to match your JCuda binaries directory. (We are repeating Step 7 in the above Setup section, this time for the new project.)
Then, run it as a Java Application. Here is the output console from my Linux Mint 13, 32 bit laptop:
Creating sin wave input data: Frequency = 11.0, N = 1048576, dt = 5.0E-5 ...

L2 Norm of original signal: 724.10583

Performing a 1D C2C FFT on GPU with JCufft...
GPU FFT time: 0.121 seconds

Performing a 1D C2C FFT on CPU...
CPU time: 3.698 seconds

GPU FFT L2 Norm: 741484.3
CPU FFT L2 Norm: 741484.4

Index at maximum in GPU power spectrum = 572, frequency = 10.910034
Index at maximum in CPU power spectrum = 572, frequency = 10.910034


Performing 1D C2C IFFT(FFT) on GPU with JCufft...
GPU time: 0.231 seconds

Performing 1D C2C IFFT(FFT) on CPU...
CPU time: 3.992 seconds

GPU FFT L2 Norm: 724.1056
CPU FFT L2 Norm: 724.10583
More about the project code
First, a word about complex data arrays; CUDA and JCuda can work with data arrays that contain complex vectors of type float or double, provided you construct the array as an interleaved, complex number sequence. This is best demonstrated with an example. Let’s say we have a complex vector of length 2: (1 + 2i, 3 + 4i). The corresponding interleaved data array has a length of 4 and has the form: (1, 2, 3, 4). In the project code I use this format for all complex vectors that are submitted to JCuda methods.
In contrast, for CPU coding simplicity, I use a ComplexFloat class to represent complex numbers. When using this class to from a complex vector, the vector x = (1 + 2i, 3 + 4i) has the form ComplexFloat[2] = (x[0].Real = 1, x[0].Imaginary = 2, x[1].Real = 3, x[1].Imaginary = 4). The array, and the vector it represents, both have the same length: 2.
Main.java is the entry point for the application. It creates a sample signal and performs the demo. The signal produced is: sin(2*pi*FREQ *t) sampled N times in increments of dT. The demo computes forward and inverse Fourier transforms of the test signal — both on the GPU and the CPU — and provides execution times and signal characteristics for the results.
The CPU FFT part of the code (FftCpuFloat.java) purposely implements the Cooley–Tukey algorithm in an awkward way that depends on instances of the ComplexFloat.java class. Little attention is paid to memory allocation and access. Also, although I have multi-core CPUs, my CPU thread executes on only one core. Doing this makes the radix-2 procedure intuitive and simple, but there is an overhead cost that will overstate the advantage of using the GPU.
You can adjust the constants (FREQ, N, and dT) for creating the test signal from the Main.java class. Using a Linux 32 bit installation on an older Dell laptop I found that, by varying the length of the test signal (N), the CPU FFT outperformed the JCuda FFT with signals that had fewer than 4096 complex elements. Thereafter, the JCuda FFT speeds overwhelmed my CPU FFT. At N = 4194304, JCuda was 250 times faster than the CPU FFT (CPU = 23 seconds, GPU = 0.9 seconds). Beyond that, the laptop fans blaze during the CPU computation loop (system temp: 90 C) and fear of thermal overload prompted me to curtail testing. (My Linux 64 bit desktop, has a 6 core AMD Phenom II on a Sabretooth mombo, 16 GiB of memory, a GeForce GTX 560 Ti graphics card, and some great fans. It can process FFTs (CPU or GPU) all night provided I manage memmory effectively.)
A fair amount of the speed advantage I observe is due to the inefficientcy of my poorly optimized CPU implementation. More rigous CPU/GPU evaluations using optimized CPU code suggest that gains are roughly 10X. I'll take 10X over 1X, but the practical reality is; the the power of CUDA's underlying implementation efficiency together with the intrinsic GPU gain (whatever it really is), collectively gives me an average 50X boost.
The Notes folder in the project download includes some tips on how to run a deployed, runnable jar. Basically, you need to use the -Djava.libraries.path switch to point to your JCuda binaries folder.
In conclusion
Getting setup and becoming acquainted with CUDA, JCuda, and Nsight takes a fair amount of work. But it's worth it. General-purpose computing on graphics processing units (GPGPU) is a very important tool to have in your coding toolbox. I hope this article helps make the process more accessible to other GPGPU novices like me. I wish you success as a cutting-edge JCuda coder!
Some references
intel-research.net on touted GPU advantages
Titan Supercomputer: 18,688 NVidia GPUs
License
This article, along with any associated source code and files, is licensed under The Code Project Open License (CPOL)
About the Author
I am a scientist and not a professional programmer. I program primarily to perform matrix computations for regression analysis, process signals, acquire data from sensors, and to control devices.
I have a personal webpage at www.mark-bishop.net