└┬╥╬┴╚╬├╨└╘╚▀
└┬╥╬╨┼╘┼╨└╥
╧┼╨┼╫┼═▄ ╤╤█╦╬╩
╬╥╫┼╥ ╬ ╧╬╚╤╩┼
╚═─╚┬╚─╙└╦▄═╬┼ ╟└─└═╚┼
Fabrication of Blanks, Figuring, Polishing and Testing of Solid and Segmented Astronomical Mirrors
Magomed A. Abdulkadyrov*, Sergey P. Belousov, Alexandr N.
Ignatov, Alexey P. Patrikeev, Vladimir E. Patrikeev, Vitaliy V.
Pridnya, Andrey V. Polyanchikov, Victor V. Rumyantsev, Anatoly V.
Samuylov, Alexandr P. Semenov, Yury A. Sharov
http://www.lzos.ru/en/articles_monolit_seg_astro_mirror.htm
ABSTRACT
JSC "LZOS" production facilities allow manufacturing optics from
casting and annealing of blanks of Sitall CO-115M to final figuring and
polishing. LZOSТs Sitall capacities allow to produce over 100 tons a
year. At the resent time Sitall is widely used for manufacturing
high-precision astronomical mirrors here at LZOS as well as at other
companies.
During 1997-2002 JSC "LZOS" has fabricated a number of
astronomical mirrors including four primary mirrors with hyperbolic
figure of 2050 mm (F/3) in diameter and two secondary mirrors of 645 mm
(F/2.5) in diameter for Telescope Technologies Ltd, UK, primary mirror
of 2280 mm (F/2.3) and secondary mirror of 753 mm (F/2) for the NOA
telescope (Astronomical Institute Ц National Observatory of Athens,
Greece), primary mirror of 2650 mm (F/1.8) and secondary mirror of 938
mm (F/2.3) with an asphericity of 100 m for the VST telescope (VLT Survey Telescope).
We have also completed a number of astronomical mirrors with
diameters up to 1300 mm for some European countries and the USA. The
rms surface quality of all of the mirrors was in the range from 9 to 12
nm. We used computer controlled figuring, polishing and testing. Some
mirrors were made of Sitall , producing by LZOS and some of Zerodur,
Schott.
Our largest current projects include 96 hexagonal segment
blanks of 1019 mm x 55 mm for the SALT primary segmented mirror
(Southern African Large Telescope), the ╠1 and ╠2 mirrors for the VISTA
project (Visible and Infrared Survey Telescope for Astronomy) where
primary mirror has 4 m diameter and secondary 1.2 m as well as 40
sub-mirrors of the LAMOST MB mirror of about 6.7m x 6m for Large Sky
Area Multi-Object Spectroscopic Telescope (LAMOST).
Keywords: telescopes, optical blank, optical fabrication, optical testing, asphere
1. INTRODUCTION
To create ground and space-based telescope mirror systems LZOS
widely applies mirrors made of glass-ceramic Sitall CO-115M (AstroSitallо),
an analogous material to Zerodur of Schott, Germany. Many years of
experience in optical components figuring has shown Sitall's
reliability and suitability for the manufacturing of astronomical and
space instruments with solid, lightweighted and thin large optical
elements1.
LZOS has accumulated substantial experience in designing and
manufacturing of optics for large-size astronomical telescopes,
development of new lightweiting mirror structures and high-accuracy
computer-controlled figuring of aspheric surfaces of lightweighted,
thin and off-axial components of an arbitrary shape2.
Our effective and successful cooperation with Carl Zeiss Jena,
Germany, in the manufacturing of large size optics for some European
countries has allowed us to flow into the manufacturing process of
optics for the 2-3 meter class telescopes with modern high quality
optical requirements and optical components complexity3,4.
Within 1997-2001 LZOS manufactured four primary hyperbolic
mirrors of 2050 mm in diameter and two secondary mirrors of 645 mm in
diameter of Sitall for the TTL (Telescope technologies Limited, UK).
Asphericity from the best-fit sphere of the primary mirrors is about 20 m and the secondary mirrors about 12
 m. We achieved an rms of about 0.03
 (
( =0.6328
 m) for the primary mirrors. The similar quality has been achieved for the secondary mirrors.
LZOS manufactured a set of optics for the NOA Telescope
(National Observatory of Athens, Greece) with a 2280 mm primary mirror,
753 mm secondary mirror and three-lens field corrector. Asphericity of
the primary mirror is about 40 m and the secondary mirror about 26
 m. An encircled energy of a system of the primary and secondary mirrors is 80% in a spot less than 0.3".
In 2001 we manufactured a unique set of optics for the VST
Telescope (VLT Survey Telescope, Osservatorio Astronomico di
Capodimonte Napoli, Italy) with a 2650 mm primary mirror and 938 mm
secondary mirror both of them having 100 m
aspherisity. The VST primary mirror is an adaptive meniscus mirror of
140 mm thick, a thickness to diameter ratio is 1:19. At present a
replica of the VST primary mirror is being manufactured at LZOS.
Now LZOS is involved in some large projects such as
manufacturing of 96 primary mirror blanks for the South African Large
Telescope (SALT)5, manufacturing and testing of the primary
and secondary mirrors for the VISTA Telescope (Visible and Infrared
Survey Telescope for Astronomy, UK)6 and shaping and final
figuring of 37 sub-mirrors of the LAMOST primary mirror (Large Sky Area
Multi-Object Spectroscopic Telescope, China)7,8.
2. FABRICATION OF BLANKS FOR LARGE ASTRONOMICAL MIRRORS
Since 1959 LZOS has mastered production of a glass-ceramic material
possessing an extremely low coefficient of thermal expansion (CTE)
Sitall CO-115M which is similar to Zerodur in optical and
physico-mechanical properties. During all the period numerous tests
have been carried out that proved stability of Sitall's properties
through the time on special purpose optics. Sitall properties in
comparison with Zerodur are given in Table 1:
Table 1. Sitall and Zerodur properties
| material | Sitall CO-115M | Zerodur |
Mean linear coefficient of thermal expansion within temperature range
-60o╤ to +60oC, (K-1) | ▒1.5 x 10⁻⁷ | ▒1.0 x 10⁻⁷ temperature range - 0oC to +50oC |
| Refraction ratio (ND) | 1.536 | 1.542 |
| Density (g/cm3) | 2.46 | 2.35 |
| Young's modulus (MPa) | 9.2x10⁴ | 9.3x10⁴ |
| Poisson's coefficient | 0.28 | 0.24 |
| Thermal capacity (J/g K) | 0.92 | 0.80 |
| Thermal conductivity (W/m K) | 1.18 | 1.46 |
| Thermal diffusivity (m2/s) | 0.52 x 10⁻⁶ | 0.72 x 10⁻⁶ |
Our production facilities allow manufacturing optics from
casting and annealing of Sitall blanks to their final figuring and
polishing. LZOS's Sitall capacities allow to produce over 100 tons a
year. Now Sitall is widely used for the manufacturing of high-precision
astronomical mirrors at LZOS as well as at other companies. Figures 1
and 2 below present the main steps of Sitall blanks production process.
LZOS has machinery providing a full cycle of optics
manufacturing from glass melting to final polishing. It consists of
equipment for:
- blanks pre-machining including cutting, rounding, ends and flat
surface machining, sphere figuring on blanks up to 6 meter in diameter;
- geometrical dimensions machining (coordinate boring, surface-grinding and other machines) to an accuracy up to 10
 m on blanks up to 4 meter in diameter;
- computer-controlled surface shaping of large optical components up to 4 meter in diameter.
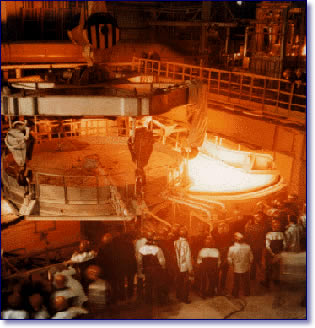
Figure.1 Casting of Sitall blanks.
The blanks geometrical dimensions machining includes standard
operations of cutting and milling of cast blanks on a special equipment
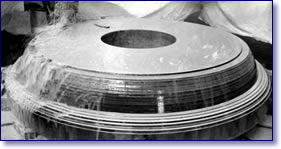
using diamond tooling (Figure 2).
Figure.2 Sitall blanks milling.
The most significant of our current works is the manufacturing of 96
hexagonal 1096 mm x 55 mm blanks for the SALT primary mirror5.
To meet successfully the SALT CTE specification new generation
interference dilatometers were developed and manufactured. They ensure
a CTE measuring error of no more than 5 x 10⁻⁹ K-1. The CTE homogeneity at 18 measured points of a blank is not more than 15 x 10-9 K-1.
Distribution of CTE over 72 manufactured blanks is shown in Figure 4.
Table 2 lists some CTE and birefringence requirements for the SALT
blanks.
Table 2. SALT blank CTE and birefringence specifications
| Average CTE | 0 ▒ 0.15 x 10⁻⁶ K-1 |
| CTE variation through blank thickness |  0.015 x 10⁻⁶ K-1 0.015 x 10⁻⁶ K-1 |
| Average birefringence | < 3 nm/cm |
| Maximum birefringence | < 10 nm/cm |
The maximum birefringence measured at the distance of 50 mm from the
edge of each of six flats of a blank segment is less than 10 nm/cm and
an average birefringence is less than 3 nm/cm.
The SALT segments are being manufactured according to the
bubbles/inclusions specification shown in Table 3. The manufacturing
process of the SALT segment blanks is shown in Figure 5.
Table 3. SALT blank bubble/inclusion specification
| Bubbles/Inclusions: | Maximum number of bubbles (inclusions) with mean diameter more than 0.2 mm depending on blank zone |
| Critical zone | Non-critical zone |
| Maximum area of bubbles (inclusions) within 100 cm3 | 2 mm2 | 2 mm2 |
| Maximum mean diameter | 2 mm | 6 mm |
| Maximum average number of bubbles (inclusions) within 100 cm3 | 5 | 5 |
Thus LZOS has manufacturing facilities, technology and qualified
staff for the manufacturing of blanks of demanded dimensions, for
instant for the 100 m OWL Telescope (Overwhelming Large Telescope). To
provide the required quantity and delivery schedule it will be
necessary to enlarge and develop the facilities and first of all in
Sitall casting. The calculations we have made show that we will need to
set in operation extra 5 bath furnaces and approximately 40 annealing
furnaces that can ensure required production volumes. It is important
to emphasize these innovations will not lead to extra construction of
new production shops because the existing production infrastructure
allows to place necessary equipment to available production areas.
Table 4 shows proposed by LZOS specification suitable for the OWL
segment blanks. This proposal could be valid for the manufacturing of
blanks for other Extremely Large Telescopes.
Table 4. Proposed OWL blank specification
| CTE and Birefringence: |
| Average CTE | 0▒0.1x10⁻⁶K-1 |
| CTE homogeneity | for single segment  0.01є10-6K-1 0.01є10-6K-1
for all segments  0.05є10-6K-1 0.05є10-6K-1 |
| Difference in CTE between back and front surfaces |  0.01є10-6K-1 0.01є10-6K-1 |
| CTE measuring accuracy |  0.005є10-6 0.005є10-6 |
| Number of CTE samples on a blank | 13 |
| Birefringence caused by striae or inclusions | within critical zone < 25 nm
outside critical zone < 50 nm |
| Permanent stress sign | minus |
| Average birefringence | < 8 nm/cm |
| Maximum birefringence | < 15 nm/cm |
| Bubbles/Inclusions: |
| Mean size | < 5.0 mm |
| Maximum size | < 8.0 mm |
| Maximum number within 10 cm-3 | < 8.0 |
| Average number | < 0.5 cm-3 |
| Maximum number of mean diameter > 1 mm at depth up to 4 mm from working surface | < 10.0 |
| Maximum size of inclusion outside critical zone | < 20.0 mm |
The flowchart below describes a standard production process proposed for the OWL segment blanks.
Flowchart of OWL Segments Production
 2300 mm x 450 mm disk casting 2300 mm x 450 mm disk casting |
 |
| Preliminary tests of material quality |
 |
Cutting into  2300 mm x 100 mm blanks 2300 mm x 100 mm blanks |
 |
Bubble and birefringence measurement, blank forming
and working surface selection |
 |
| Preliminary cutting into 1850 mm hexagonal |
 |
| Both-sides grinding up to 80 mm thickness |
 |
| Final geometrical dimensions milling |
 |
| Central blind hole manufacturing |
 |
| Fabrication of CTE test samples |
 |
| Spherical surface figuring |
 |
Final test of blank parameters,
blank certification |
 |
| Packing of blank |
3. PRODUCTION OF SUB-MIRRORS FOR LAMOST MB MIRROR
LZOS can manufacture both blanks for optical components and finished
optics of Sitall, Zerodure and other optical materials.

Figure.3 Computer-controlled polishing
of optical components.
|
At present the manufacturing of finished sub-mirrors of the primary
mirror for the LAMOST (The Large Sky Area Multi-Object Fiber
Spectroscopic Telescope, China) is going on at LZOS. The sub-mirrors
are made from Zerodur supplied by Schott. The LAMOST telescope is a
reflecting Schmidt telescope. There are two large segmented mirrors in
the LAMOST: one is the Schmidt plate MA, and the other is the spherical primary mirror MB. The dimension of MB is about 6.7m x 6m. It is composed of 37 hexagonal sub-mirrors.
Table 5. MB Sub-mirror Specification
| Material | Zerodur |
| Number | 40 blanks |
| Shape | hexagonal |
| Surface shape | concave, sphere |
| Diagonal dimension | 1100 mm |
| Thickness | 75 ▒ 0.25 mm |
| Radius of curvature | 40000 ▒ 40 mm |
| Surface rms | < 20 nm |
| Surface p-v | < 150 nm |
| Difference of sub-mirror radius (with respect to a reference mirror) | < 1.5 mm |
The technological process of sub-mirrors manufacturing includes
the final geometrical machining (Figure 9), back surface grinding,
milling of slots and chamfers, central hole milling and then bonding of
support Invar elements (Figure 10), and after final polymerization of
bonded elements the sub-mirror is set on a machine for the optical
surface grinding and polishing. The polishing of the sub-mirrors is
carried out in a thermo-stable optical shop at a temperature of 22 ▒ 1 oC.
After a session of surface treatment the sub-mirror is set on
the membrane technological cell into a test bench. This cell allows
deformation changes of the sub-mirror surface shape during
technological and certification tests in permissible limits lesser by
amplitude than the required surface error. The cell has an automatic
system of mirror position stabilization when changing environmental
conditions (atmosphere pressure, moisture) in the course of the surface
shape testing and provides constant surface shape with necessary
precision. Consequently with more stable mirror position we have
reached the high quality of optical surface.
In the course of the testing process the sub-mirror is installed on
18 supports. The analysis of the sub-mirror support system was made
using a model of the sub-mirror with its actual dimensions (with holes
and slots). The model is divided into 9453 elements of Solid95 type.
Mounting on the 18 supports is made under pressure of 81.3633 N (8.294
kg). The sub-mirror model is constrained against displacement on three
points coincident with inside circle supports. Support reactions are
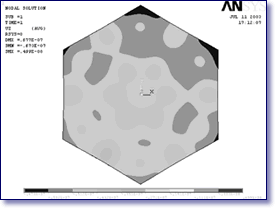
not more than 0.02 N (2 g). Figure 11 presents the sub-mirror model and
topography of the surface shape deviation from the required one. The
achieved wavefront deformation is 0.014 (8.86 nm) rms and 0.076
 (48 nm) p-v.
The main complexity of the spherical surface testing of the sub-mirrors of the segmented primary mirror MB
is a large radius of 40000 mm and a tolerance of a radius deviation of
▒ 1.5 mm for all the sub-mirrors. The required specification is met
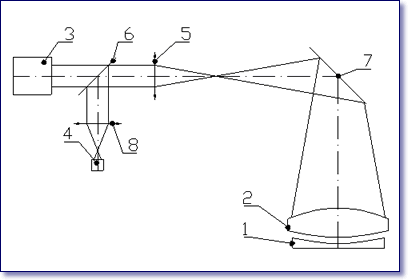
only with using a vertical Fizeau test set-up. This method
allows to reduce a test path up to 10184 mm as well as to carry out the
testing with respect to one reference surface. Defocusing of more than
▒ 0.5 will be an evidence of a radius deviation of more than ▒ 1.5 mm. The
basic element of the optical test setup is a Fizeau lens one surface of
which has a radius of curvature of 40000 ▒ 20 mm and represents as a
reference surface. The other surface of the lens is hyperbolic and
serves to direct rays of a homocentric beam along the normal to the
spherical surface. The CTE value we measured for the Fizeau lens
material (fused silica KV) was 0.3 x 10⁻⁶K-1.
Figure.4 Sub-mirror model and surface topography on membrane-pneumatic support system.
To implement this test method a test bench was designed and mounted
(Figure 13). The test bench is used for the testing of both the Fizeau
lens and spherical sub-mirrors. To test the spherical lens a 1200 mm
reference spherical mirror with a radius of curvature of 40000 ▒ 7 mm
was produced of Sitall. The certification of the reference mirror was
carried out in a special vertical test tower on the basis of a 70 m
height vacuum chamber. Figure shows the interferogram of the Fizeau
lens tested using the spherical reference mirror. An rms is less than
0.05 (
( =632.8
nm). The sub-mirror is set under the Fizeau lens on a definitely fixed
distance in order to insure required tolerance for a difference of
sub-mirror radius within a range < 1.5 mm.
4. CONCLUSIONS
LZOS manufactures both optical blanks including blanks of Sitall and
finished optics of Sitall, Zerodur and other optical materials. LZOS
has great experience in designing and manufacturing of large astronomic
optics, development of new lightweighted mirrors, computer-controlled
forming of high-accuracy optical non-spherical surfaces of lightweight,
thin and off-axis components of arbitrary shape.

Figure.5 Fizeau test setup used for testing of segmented mirror elements:
1 - Sub-mirror to be tested; 2 - Fizeau lens with reference surface;
5,6,8 - Elements of interferometer 3; 4 - CCD camera; 7 - Diagonal mirror.
The most important work on the Sitall blanks manufacturing is our
contract for delivery of 96 segment blanks for the SALT primary mirror.
The most important of our existing works on the segments figuring is
the contract for the polishing of 40 LAMOST primary mirror sub-mirrors
made of Zerodur. At the moment the test bench is designed and mounted
and the figuring of the first sub-mirrors is in progress.
LZOS's production potential after increasing its Sitall
melting capabilities will allow manufacturing of blanks for primary and
secondary mirrors of Extremely Large Telescopes on existing production
areas.
REFERENSES
1. M. A. Abdulkadyrov, S. P. Belousov, A. N. Ignatov, V. V.
Rumyantsev, Non-traditional technologies to fabricate lightweighted
astronomical mirrors with high stability of surface shape. Proceedings
of SPIE, 3786, pp. 468-473, 1999.
2. A. P. Semenov, V. E. Patrikeev, A. V. Samuylov, Y. A. Sharov,
Computer-controlled fabrication of large-size ground and space-based
optics from glass ceramic Sitall CO-115M. Proceedings of SPIE, 3786, pp. 474-479, 1999.
3. M. A. Abdulkadyrov, S. P. Belousov, A. N. Ignatov, V. E.
Patrikeev, V.V. Pridnya, A.V. Polyanchikov, V. V. Rumyantsev, A. V.
Samuylov, A. P. Semenov, Y. A. Sharov, Manufacturing of primary mirrors
from Sitall CO-115M for European projects TTL, NOA and VST. Proceedings
of SPIE, 4451, pp. 131-137, 2001.
http://www.lzos.ru/en/articles_monolit_seg_astro_mirror.htm
└┬╥╬┴╚╬├╨└╘╚▀
└┬╥╬╨┼╘┼╨└╥
╧┼╨┼╫┼═▄ ╤╤█╦╬╩
╬╥╫┼╥ ╬ ╧╬╚╤╩┼
╚═─╚┬╚─╙└╦▄═╬┼ ╟└─└═╚┼
 m for the VST telescope (VLT Survey Telescope).
 (
(
 0.015 x 10⁻⁶ K-1
 2300 mm x 450 mm disk casting


