Source of information: http://www.premalab.re.kr/paper/paper_data/Chracterization%20of%20magnetic%20abrasive%20finishing%20method.pdf
Abstract. This paper analyzes the effectiveness of using Magnetic Abrasive Finishing (MAF) to remove burrs on drilled holes located on planes. Basic elements of the equipment in this method are a magnetic inductor; powder with magnetic and abrasive properties, which serves as the cutting tool; and the face electromagnetic inductor and the vibrating table, which were developed for deburring and finishing on flat surfaces. The performance of magnetic abrasive powders produced by industry is also evaluated. A new technique was developed to compare the performance of the magnetic abrasive powders and to find the powder that is appropriate for finishing and deburring drilled holes placed on a plane steel surface.
Introduction
Burrs are widespread defects of machining. Their removal requires additional technological operations, time, and cost. Burrs are often removed manually, despite todayís high level of automation. Burrs formed in drilling induce difficult technological problems, for several reasons. The removal of these burrs after drilling with a countersink does not always have satisfactory results, as countersinking creates secondary burrs inside a hole and forms an undesirable chamfer on the hole edge [1]. Magnetic Abrasive Finishing (MAF) may solve this problem. It does not create secondary burrs but instead, produces a round edge, the radius of which can be managed [2]. MAF has been successfully applied to deburring on a workpiece contour after sheet metal stamping [3]. However, deburring on planes of workpieces using the MAF method requires more investigation. The authors have published some aspects of their research on this area [4 and 6]. In this paper the authors describe their investigation on deburring of planes with using the electromagnetic inductor and the vibrating table.
Investigation of Deburring on Planes after Drilling by MAF Method
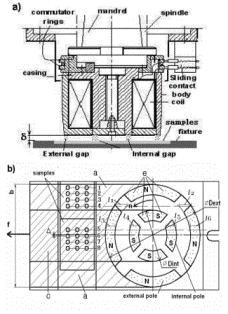
Electromagnetic Inductor. The electromagnetic inductor was used as a source of a magnetic field
(Fig. 1). The internal and external poles on its bottom face plane were separated into sectors of rings to
increase the concentration of the magnetic flow in a working gap and to create additional radial edges,
ìeî, as concentrators of magnetic flow, which enabled the powder to rotate following the inductor.
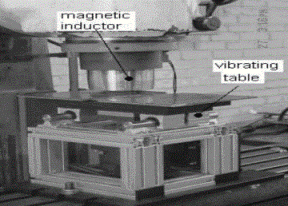
The inductor was fixed in a spindle of the milling machine. The vibrating table was installed on a
table of the milling machine for fastening of samples during the experiment and for imposition of an oscillation movement on a horizontal plane (Fig. 2). The
work surface of the samples with burrs formed after drilling of holes was placed on the same level as the
steel top plane of the fixture. A working gap was established between the work surface and the inductor
poles. The working gap was filled with the magnetic abrasive powder before the deburring operation.

The magnetic field kept the powder in the working gap and created normal forces in the contact of the powder with the inductor poles and the work surface [2]. The magnetic forces and friction forces between the poles and the powder were larger than the ones between the work surface and the powder. For this reason, the powder followed the poles of the rotating inductor. The vector and the value of the magnetic force Fm that acted on each grain of the powder was determined using the formula [2]:

in which µ0 is the magnetic conductivity of the vacuum; Vgr is the volume of the grain; and ¬ and gradB are the magnetic induction and its gradient at a point of arrangement of the grain. The quantity of the powder placed in the working gap was determined using the recommendation in [2].
Vibrating Table. Previous researches [2,3, and 6] have shown that oscillation of a workpiece or
inductor poles during MAF increases productivity and improves the roughness of a work surface.
Additional oscillation increases the mobility of the grains of the powder in the working gap and thus
raises the cutting ability of the powder. The interrupted contact induced by oscillation reduces the
friction between the powder grain and the workpiece surface, which helps keep the powder from
scattering. Besides, the additional oscillation perpendicular to the feed direction increases the relative
motion and improves the roughness of the work surface.
In this research, a vibrating table was made to find out the role of oscillation during deburring using
the MAF method. The vibrating table shown in Fig. 2 allows the imparting of the oscillation movement
to samples in a cross or longitudinal direction to feed motion. Samples were fixed on a top plate, which
was made from ferromagnetic steel. The construction of the vibration table allow operate the frequency
and the amplitude of the oscillation.
Characteristic Equation for the Magnetic Abrasive Finishing Method. Magnetic abrasive powders carry out the role of an abrasive tool. The efficiency of deburring depends on the powdersí characteristics. The powders are characterized by many parameters, the properties of which are shown under the magnetic field and depend on the operating condition. A method of evaluating the performance of the powders is proposed here, which can be applied in any shop with machines for MAF. The machining characteristics and tool life of the powder in surface finishing are very important for efficient MAF operation. The experimental relationship for the specific removal (q) in surface finishing is represented in Fig. 3. The following characteristic equation for the specific removal mass in the surface finishing operation by MAF is suggested based on experimental experience[2]:

in which q, mg/cm2 is the removed mass from the 1cm2 area of the work surface in time; q1, mg/(cm2*min) is the removed mass from the 1 cm2 area in the first minute (1 second or 1 hour can also be chosen as the time unit); and m is an exponent that describes the productivity of the MAF process, which is less than 1.
The parameter q1 is offered for use to compare the cutting properties of powders in the given conditions of MAF. The parameter m is convenient for an indirect estimation of the tool life of the powder. Certainly, the parameters q1 and m in Eq. (2) depend not only on the properties of the powder but also on the magnetic inductor design and all other conditions of the MAF operation. Therefore, comparison of the powders is recommended for maintenance of constant conditions of the MAF. In this case, parameters q1 and m will fully reflect the cutting properties of the powders. The cutting ability of the powder placed in a working gap is reduced due to the wear and destruction of the abrasive grains of the powder. And the reduction of the amount of the powder because of its dispersion.
The parameters q1 and m were obtained by mathematical processing from the experimental relations q = f(t). The relationship of parameter "m" to the tool life of the powder is visible in the following equation. Derivatives q to t refer to the surface removal rate by the same portion of the powder at the moment tqi:


It follows from Eq. (3) that the longer the operation time ti, the lower the removal rate qíimg/(cm2*min). By finding the minimum removal rate qíi= qímin, when the powder should be replaced,it becomes possible to calculate the allowable powder operation duration, T, of the powder using Eq.(4). The time T refers to the tool life of the powder and may be used to compare powder performance.
Experiments to Determine the Performance of Magnetic Abrasive Powders
Experiment to Compare Powder Performance in Surface Finishing. A series of tests was executed for composite magnetic abrasive powders that were made by the company SPC ìReactivelectronî NAN Ukraine specially for polishing using the MAF method. The powders are listed in Table 1. The grains of each powder contain abrasives such as TiC or NbC and a ferromagnetic component such as iron or polymer (the structure of the last one is unknown). The ferromagnetic component simultaneously provided the magnetic and mechanical properties of the grains and served as a binding material (bundle). The powders had different granularities and locations of abrasives in their composite grain i.e., on their surface or distributed throughout its volume.
Table 1. Data and results of the powders test
| π | Powder composition | Size of composite grain V, µm | Size of abrasives ?, µm | Location of abrasive in the composite grain | Initial productivity q1, mg/(cm2*min) | Exponent m | Tool life “, min |
|---|---|---|---|---|---|---|---|
| 1 | Fe-TiC | 500/400 | 20/14 | In a body | 0.55 | 0.46 | 3.60 |
| 2 | Fe-TiC | 400/300 | 20/14 | In a body | 0.54 | 0.48 | 3.78 |
| 3 | Fe-TiC | 180/100 | 20/14 | In a body | 0.44 | 0.49 | 3.89 |
| 4 | Fe-TiC | 500/400 | 40/28 | On surface | 1.09 | 0.4 | 3.43 |
| 5 | Fe-TiC | 400/300 | 40/28 | On surface | 0.51 | 0.58 | 5.20 |
| 6 | Fe-TiC | 180/100 | 40/28 | On surface | 0.47 | 0.59 | 5.43 |
| 7 | Polymer-TiC | 500/400 | 40/28 | On surface | 0.49 | 0.58 | 5.20 |
| 8 | Polymer-TiC | 400/300 | 40/28 | On surface | 0.27 | 0.62 | 6.19 |
| 9 | Polymer-TiC | 180/100 | 40/28 | On surface | 0.36 | 0.45 | 3.53 |
| 10 | Polymer-TiC | 500/400 | 20/14 | In a body | 0.44 | 0.64 | 6.87 |
| 11 | Polymer-TiC | 400/300 | 20/14 | In a body | 0.23 | 0.68 | 8.69 |
| 12 | Polymer-TiC | 180/100 | 20/14 | In a body | 0.58 | 0.61 | 5.9 |
| 13 | Fe-NbC | 500/400 | 40/10 | In a body | 0.45 | 0.60 | 5.66 |
| 14 | Fe-NbC | 300/200 | 40/10 | In a body | 0.49 | 0.28 | 2.62 |
| 15 | Fe-NbC | 200/180 | 40/10 | In a body | 0.60 | 0.46 | 3.60 |
| 16 | Fe-NbC | 100/40 | 40/10 | In a body | 0.31 | 0.61 | 5.90 |
This series of tests was executed to obtain the experimental relationship q = q1tm in surface finishing for comparison of magnetic abrasive powders. Similar samples were provided without holes and placed in section ìc,î as shown in Fig. 1b, for homogeneity of performance. The surfaces were grounded to maintain the same surface condition. The magnetic inductor described in Fig. 1a was used. The test conditions were as follows: the sample material is alloy steel SM45C; the volume of the
powder portion Vp is 19 cm3; n = 130 min-1; f = 187 mm/min; I = 1.0A; the height of gap 2 mm; and the duration of the test of each powder t= 6.4 min (15 strokes of the table). A coolant was injected periodically into the working gap during the test.
For each powder from the list in Table 1, the characteristic Eq. (3) is obtained by experiment and approximation. The parameter q1 and the tool life T were chosen as criteria for the comparison of the powders. The initial productivity q1 characterizes the cutting ability of the powder in its initial condition. To calculate the tool life T using Eq. (4), it was conditionally accepted that the minimum removal rate, qímin, is equal to half of the initial removal rate at t=1 and qímin= 0.5*qí1. By substituting t=1 into Eq. (3), qí1=m*q1 and qímin=0.5*qí1. Therefore qímin=0.5*m*q1 can be substituted into Eq. (4). Then the tool life of the powder is obtained simply from T = 21/(1-m). The tool lives are calculated and listed in Table 1. The general level of the tool life of the powders in Table 1 is small, which can be explained by a rather small magnetic induction, B=0.47*T, at the working gap, and the gradual scattering of the powder from the working gap for this reason. Nevertheless, the results allow the analysis of the characteristics of the compared powders.
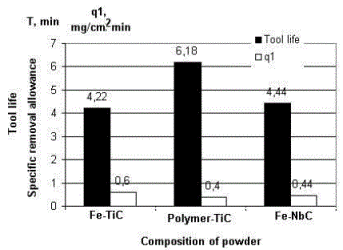
Values q1 and T for the powders with identical chemical structures were averaged and are represented in Fig. 3. Powders Fe-TiC showed higher cutting properties than powders Polymer-TiC, although they had the same abrasive component as titanium carbide. It is possible to assume that the higher cutting ability q1 of the powder Fe-TiC is explained by the higher magnetic properties of its ferromagnetic component, Fe. Powders Polymer-TiC had higher tool lives because of the higher level of durability of its ferromagnetic component, ëpolymer.í Unfortunately, the manufacturer of the powders has not provided data on the powdersí magnetic and mechanical characteristics, due to which we cannot confirm our assumptions of the figures.
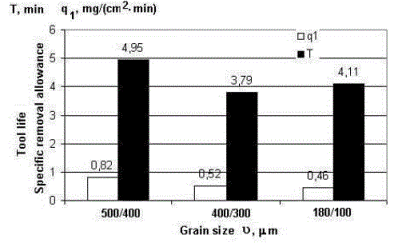
The influence of the sizes of the grains of the powders is shown in Fig. 4, in the example of the Fe-TiC composition. The data for the powders with different abrasive particle sizes and different composite grain arrangements were averaged to obtain more authentic results. The reduction of the grain size V results in the decrease of the cutting ability of the powder Fe-TiC and the increase of its tool life. These results conform to Eq. 1. Smaller magnetic forces work on grains with smaller sizes (V). Accordingly, the cutting forces are also reduced.
Powder no. 4 had the highest initial productivity q1 and powders nos. 7, 10, 12 and 13 had high tool lives at a high enough initial productivity. Because of their high tool lives, the last powders are preferable due to the stability of the MAF process. Therefore, powders nos. 4, 5, 7 and 13 are used in subsequent researches on deburring.
Deburring using the MAF Method. It is possible to predict the cutting performance of powder
according to the characteristic curve obtained from the surface finishing test. Deburring
performancewas examined using the same powder as in surface finishing. Powders for experiment are
selected according to the characteristic curve. Those with three different compositions were selected for
the burr removal experiment on the basis of the powder test resultsñi.e., Fe-TiC (no. 4), Polymer-TiC
(no. 7), and Fe-NbC (no. 13) which showed good finishing performance. They had the same
composite grain sizes of 500/400 µm. Burrs were formed by drilling an SM45C plate using a carbide
drill with a diameter of 3 mm. Regular burrs were produced and measured with a laser sensor. Samples
were located in section ìc,î as shown in Fig. 1, to produce a uniform deburring effect. The same cutting
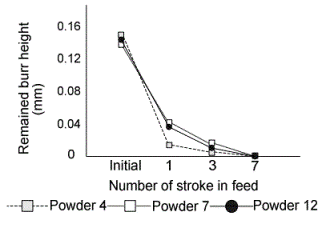
conditions as those in the surface finishing test are used for deburring. The averaged burr heights are
represented in Fig. 5 according to the scheduled number of table strokes using the three powders
selected before. The reliability of the measured data with a laser sensor has been discussed in a
previous work [6].
In powder no. 4, burrs are removed almost after three strokes, as shown in Fig. 5. They remain
after three strokes, when powder numbers. 7 and 13 were used for deburring. After 7 strokes of all
powders, however, they were removed completely. It took about 40ñ60 seconds to remove burrs with
an initial height of 0.15 mm using powder no. 4. At the same time, the top surface is polished. Burrs are removed from each hole in section
ìcî of the fixture. The result of this comparison proves the
reliability of the characteristic curve obtained from the
finishing test. This result suggested the very important
application of the characteristic curve to the selection of
the proper powder for efficient deburring. Likewise, the
method could be used to evaluate the performance of
newly developed powders.
Regarding deburring efficiency, it was well proven that the magnetic abrasive deburring method is very effective. The edge shape after deburring was very sharp. The corner shape could be managed by controlling deburring conditions such as deburring duration, proper powder, and current, among others.
Summary
References