Actuality.
Specialist on materials with growing interest address to research of structural transformations in liquid metals and alloys in connection with their influence on property of crystal and amorphous firm bodies. As it is known, after alloy fusion its crystallisation occurs according to the diagramme of a condition of forming elements for the given alloy, being a graphic representation of parities between parametres of a condition of physical and chemical system (temperature, pressure, etc.) and its structure. One of the most effective and often used ways of research of structure расплава is measurement of kinematic viscosity.
In technological processes on manufacture and processing of metals and their alloys the control over their condition is carried out behind results of measurement of physical parametres as which act density more often, viscosity and adiabatic compressibility. These parametres are reflexion of fundamental properties of liquids which define their condition. So the density characterises structure, and viscosity and adiabatic compressibility – forces of an intermolecular attraction and pushing away, accordingly.
At manufacturing cast in block products of the difficult from a steel and its alloys, and also in the course of continuous pouring became the important tasks the control of viscosity of the steel which is in the fused condition is. It is connected with the control necessary fluidity an alloy for: uniform filling of the form at the minimum expenses of energy carriers on alloy warming up in a case cast in block products; avoidance of premature deterioration of a crystallizer which is under pressure at contact to a stream of the fused metal in case of continuous casting steels.
By working out of new marks of different alloys of metals corresponding diagrammes of a condition which display all necessary data on an alloy throughout all process of its manufacturing are created. For the decision of such tasks it is necessary to conduct the constant control of structure расплава for the purpose of revealing of structural transformations. In connection with labour input of process constant sampling, use of devices of the control of physical parametres of the alloy directly connected with its structural structure most informative of which is viscosity is expedient.
Problem statement.
In the course of the analysis of existing methods many of them have appeared inapplicable for measurement of viscosity of metal (capillary, with the falling ball, based on mutual moving of two cylinders). The Most widespread at present methods of such control is rotational and vibrating viscosimetry. But use of the specified methods in the described situation is connected with a number of difficulties, basic of which there is a direct contact of a sensitive element viscosimeters with an excited environment, the leader to its premature deterioration, impossibility continuous the control express train. Therefore there were preconditions for working out of a contactless method the express train of the control of viscosity melts.
The problem decision.
At the heart of an offered way of the express control measurement of acoustic characteristics of initial raw materials (factor of absorption, speed of distribution of ultrasound) methods of molecular acoustics lies.
On speed of a sound it is possible to define such characteristics of substance as compressibility, the relation of thermal capacities, elastic properties of a firm body, etc., and on sound absorption — values of shift and volume viscosity, time of a relaxation, etc. In a liquid, calculating speed of a sound on the basis of model of a liquid and comparing results of calculation to the skilled data, in some cases it is possible to estimate plausibility of used model and to define energy of interaction of molecules. Speed of a sound is influenced by features of molecular structure, force of intermolecular interaction and density of packing of molecules.
At presence relaxation processes energy of progress of molecules which they receive in a sound wave, is redistributed on internal degrees of freedom. Thus there is a dispersion of speed of a sound, and dependence of product of factor of absorption for length of a wave from frequency has a maximum on some frequency, is called as frequency of a relaxation. The size of a dispersion of speed of a sound and size of factor of absorption depend on what degrees of freedom are raised under the influence of a sound wave, and the frequency of a relaxation equal to return value of time of a relaxation, is connected with speed of an exchange of energy between various degrees of freedom. Thus, measuring speed of a sound and absorption depending on frequency and defining relaxation time, it is possible to judge character of molecular processes and about what of these processes brings the basic contribution to a relaxation. These methods it is possible to investigate excitation of oscillatory and rotary degrees of freedom of molecules in liquids, processes of collision of molecules, reorganisation of molecular structure in liquids, processes of a shift relaxation in very viscous liquids and polymers, etc.
In molecular acoustics ultrasound application is connected as with high development of technics of its radiation and reception and the big accuracy of measurements in this range of frequencies, and that work on lower frequencies would demand very much great volumes of investigated substance, and on higher frequencies sound absorption becomes so big that many acoustic methods appear inapplicable.
Projecting apparatus
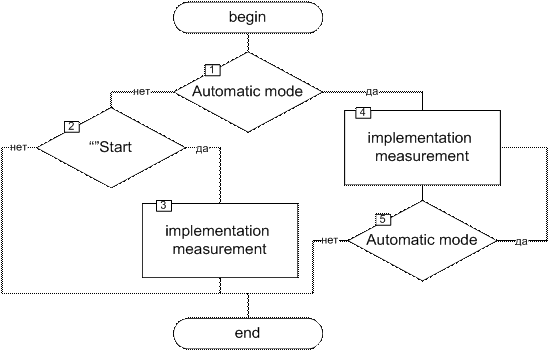
The algorithm of the device
The developed algorithm works for the designed measurement system has the form shown in Figure 1

The detailed algorithm of the measurement process is shown in Figure 2

Working out of ultrasonic measuring system
The method of measurement of local values of speed and attenuation of the following acoustic waves, based on registration of a field of a following wave by means of a motionless lattice of ultrasonic converters is offered. In comparison with known methods in which mechanical scanning of the focused single converters concerning investigated area of the sample is used, the offered method possesses fast action at the expense of electronic switching of reception channels of a lattice and does not demand application of precision mechanical scanners. The beam model of measuring ultrasonic system with a lattice of ultrasonic converters and electronic scanning (fig. 3) is offered.
Now ultrasonic systems, intended for measurement of local values of elastic parametres of object, are based on processing of the existential signals received at mechanical moving focused converters concerning the sample. In quantitative acoustic microscopy the greatest distribution the method, consisting in scanning of the focused converter perpendicular has received surfaces of the sample [1]. Recently the scheme of measurements with the transferring and reception converter which focuses settle down in a plane of the sample, and a target signal реги¬стрируется at moving of the reception converter in parallel this plane [2,3] has been offered. By processing of a target signal of similar systems in existential or spectral area restoration of factor of reflexion of an ultrasonic wave depending on a hade on an interface the environment of distribution-sample and definition of local values phase скоро¬сти and factor of attenuation of following acoustic waves, such as waves of Releja, Lemba, sliding longitudinal waves is possible.

Owing to necessity of mechanical moving preobrazo-vatelej the specified systems have the common faults expressed in a slowness of process of measurement and presence of mechanical knots which error limits accuracy of measurements.
As a sensitive element it is offered measuring ultrasonic system in which the acoustic field of a following wave is accepted by a motionless lattice of ultrasonic converters (from family materials, isomorphic gallogermanat calcium), and the target existential signal is formed by electronic switching of reception channels.
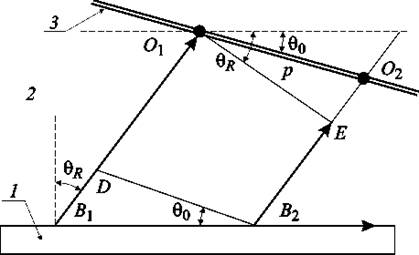
The offered method of measurements can be explained by means of the beam model presented on fig. 1. Let following akustiche-skaja the wave is raised by some converter located more to the left of point B1 and extends along a surface of the sample 1, pere-being radiated in a direction of a reception one-dimensional lattice of the converters 3 inclined on a corner ![]() 0 in relation to plane of the sample and having the spatial period 0102 = p.
0 in relation to plane of the sample and having the spatial period 0102 = p.
Let's define relative time delay Dt and the relation of amplitudes of responses of two next elements of the lattice which position is defined by points O1 and 02. Excitation of these responses is made accordingly by acoustic beams В101 and B202, extending under a critical angle ![]() R.
R.
Let's lower a perpendicular 01Е on piece B202. As time of distribution of a following wave to points 01 and Е is identical, the second response appears the arrested person concerning the first piece for the period of passage ЕО2. Thus,
|
(1) |
гwhere C - the wave velocity in the medium. By measuring the delay in responding D t adjacent lattice elements, we can determine the critical angle of the leaky wave ![]() R, and consequently, its velocity
R, and consequently, its velocity
|
(2) |
The ratio of the amplitudes of harmonic responses of neighboring array elements A2/A1 determined by the coefficient of attenuation of ultrasound in the space between the sample and UMS ![]() w and damping coefficient of the leaky wave
w and damping coefficient of the leaky wave ![]() :
:
|
(3) |
Attenuation of ultrasound in air-gas environment, characteristic of predpoverhnostnogo layer of molten metal is determined by the relationship:
![]() , dB / km
, dB / km
Draw a parallel B2D 0102. Then V1O1-V2O2 = B1D. Coming from the triangle V1V2D on the law of sines we have
|
(4) |
Finally, for the ratio we obtain:
|
(5) |
Thus, measuring the ratio of N and the critical angle ![]() RAnd knowing the attenuation coefficient in air environment
RAnd knowing the attenuation coefficient in air environment ![]() w, we can determine the damping coefficient of the leaky wave
w, we can determine the damping coefficient of the leaky wave![]() .
.

(GIF-animation: the number of frames - 12; the number of repetitions - indefinitely;
Size - 452х187, volume - 41,1 KB)
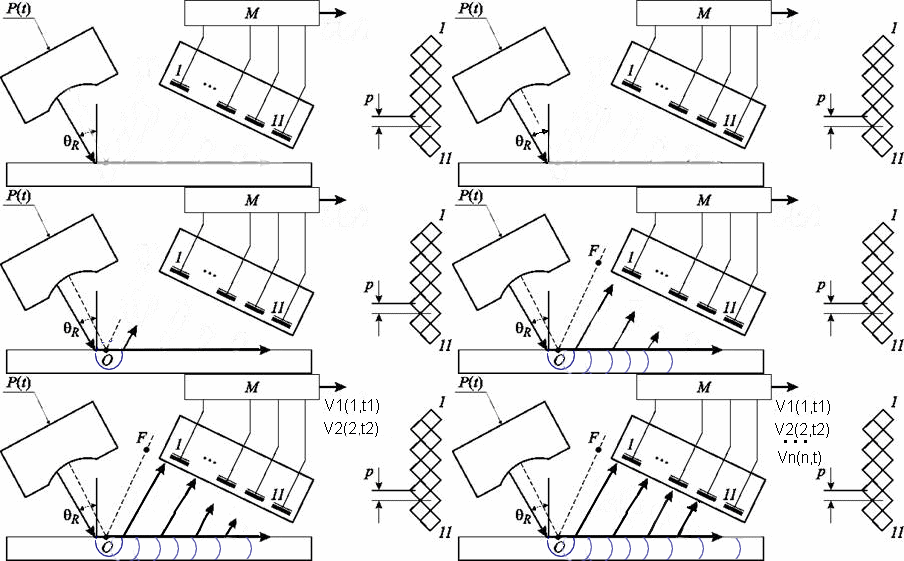
The scheme of the experimental system constructed on предложенно¬му to a principle, is presented on fig. 2. The probing ultrasonic wave is created by focused converter IS-HR-1/4-20 (XACTEX Inc., USA), having the central frequency 20MHz, diameter of the aperture 6mm and a focal length 19mm. The reception lattice consists from 11 identical квад¬ратных converters with the party 1.25 mm which scheme of an arrangement is resulted in drawing on the right. Such arrangement of elements of a lattice has allowed to receive the spatial period in a direction of registration of the following wave, equal p = 0.884 mm. Converters are executed from ниобата lithium PZT-5 which thickness corresponds to the central frequency 20 MHz. The external surface of piezoelements is covered by the general thin-film earthen electrode, and their inside for maintenance bandwidth is connected with acoustically agreed damper.
The focused transducer and grating are tilted with respect to the vertical axis at an angle ![]() 0 = 27.0o. The distances between the transducer and the specimen grating should be chosen in such a way that would be a mirror image of the focus F located in the area between the transducer and the melt surface to the left of the lattice as shown in Fig. 2. Thus, the ray OF, specularly reflected from the surface of the sample passes by receiving elements, and the output signal of the entire grid was determined by the responses of the leaky wave.
0 = 27.0o. The distances between the transducer and the specimen grating should be chosen in such a way that would be a mirror image of the focus F located in the area between the transducer and the melt surface to the left of the lattice as shown in Fig. 2. Thus, the ray OF, specularly reflected from the surface of the sample passes by receiving elements, and the output signal of the entire grid was determined by the responses of the leaky wave.
Elements receiving array sequentially connected through a multiplexer (M) to the input of the broadband (1-30 MHz) amplifier standard ultrasound system. While collecting a full set of data V (n, t), where n = 1 ,..., 11 - the channel number does not exceed 100 ms.
To measure the velocity of the leaky wave is necessary to register the time delay taken in each channel pulses, and calculate the average relative delay D t. To determine the damping coefficient of the leaky wave responses of V (n, t) are first spectral analysis and calculated for a certain frequency the average ratio of the responses of neighboring elements of the lattice N. The rate of Cr and the damping coefficient ![]() leaky wave is then calculated for the derived formulas (1), (2) and (5).
leaky wave is then calculated for the derived formulas (1), (2) and (5).
For experimental verification of the proposed method was held from the study of a number of materials, the acoustic properties of which were determined by an independent method. As a typical example in the table shows the results obtained for plane-parallel to the samples of fused quartz and aluminum alloy.
Measuring the speed of longitudinal and transverse VL Vs waves con-tents took ehoimpulsnym method [4] using, respectively converters V205 and V156 (Panametrics, USA). Using the obtained values of VL, Vs , and density of the material were the pole of the reflection coefficient of a plane wave from an interface gas mixture sample, the real and imaginary parts are calculated speed C*R and the damping coefficient as ![]() * follows a Rayleigh wave, respectively [3].
* follows a Rayleigh wave, respectively [3].
Comparison of the calculated values of velocity and attenuation of leaky waves with the values of CR and ![]() , the measured system with ultrasonic grating transducers and electronic scanning, exhibit-ruet satisfactory agreement, which may be regarded as experimental confirmation of the proposed method.
, the measured system with ultrasonic grating transducers and electronic scanning, exhibit-ruet satisfactory agreement, which may be regarded as experimental confirmation of the proposed method.
Table 1
| Material | VL, m/s | Vs, m/s | C*R, m/s | CR, m/s | ||
|---|---|---|---|---|---|---|
| Fused quartz | 5959 | 3767 | 3426 | 0.28 | 3430 | 0.30 |
| Aluminum alloy | 6393 | 3163 | 2960 | 0.24 | 2973 | 0.28 |
Using a
1. Линчевский Б. В. Техника металлургического эксперимента, «Металлургия». - М., 1967. - 239 с.
2. Михайликов С.В., Штенгельмейер С.В., Ершов Г.С., Изв. Ан СССР. Металлургия и горное дело. - №1, 1964.
3. Новохатский И.А., Скрябин В.Г., Белова С.М., Гайдаренко И.А. Журнал физической химии, 1978, 52 №2, стр. 272.
4. Мазурин О.В., Стрельцина М.В., Швайко-швайковская Т.П. Свойства стекол и стеклообразующих расплавов. Справочник, Т.1, стр. 444.
5. Измерения в промышленности. Дел. издательство В 3-х кн. Кн. 2. Способы измерения и аппаратура. Пер. с англ. под ред. Профоса П. М.: Металлургия, 1990. - 384 с.
6. Технологические измерения и приборы для химических производств, «Машиностроения». - М., 1983. - с. 424.
7. Реология. Концепции, методы, дополнения, Профессия - М., 2007 - 560 с.
8. Михайлов И.Г., Соловьев В.А., Сирников Ю.П. Основы молекулярной акустики - М.: Наука, 1964. - 516 с.
9. Виноградов Г. С., Малкин А. Я. Реология полимеров. М.: Химия, 1977.-440 с.
10. Рябцева Е.Н. Флоуметры фирмы "Transonic Systems Inc." эл. ресурс: http://www.transonic.ru/books/book97/rjabts7.html


