|
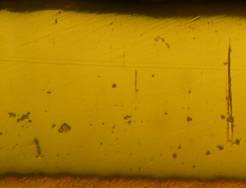
The structure and properties of galvanic chromeplated copper sample is studied. In figure 1 the structure of the layer which has been not processed thermally is resulted..

Figure 1 – Structure it is chromeplated a layer before heat treatment, х200
Apparently from drawing 1, the covering is homogeneous, has a small amount of defects (time), the border of section of a covering and the basic metal – copper is accurately visible.
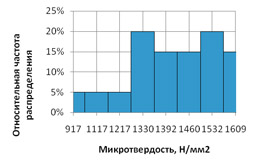
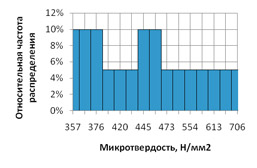
Microhardness of a layer (figure 2) an order 14186 N/mm2, the basic metal – 465 N/mm2.
 |
 |
| а |
b |
а – microhardness of chrome;
b – microhardness of copper;
Figure 2 – Microhardness of a chromic covering and copper before heat treatment
For increase in durability of coupling of a covering with the basic metal has been spent fivefold annealing at temperatures 350±20oC With duration 1 hour everyone with cooling on air.
After everyone annealing has been made polish for studying of a microstructure and microhardness is measured.
In figure 3 structures of a covering after everyone annealing are resulted.
а – after first annealing;
b - after second annealing;
c – after third annealing;
d – after fourth annealing;
d – after annealing;
Figure 3 – Structures of covering Cr after everyone annealing.
Apparently from the resulted images of a covering after everyone apparently from the resulted images of a covering after everyone отжига (figure 3) visible changes of structure have not occurred, we see a small amount of defects of a covering and border has undressed a covering - the basic metal (figure 3) visible changes of structure have not occurred, we see a small amount of defects of a covering and border has undressed a covering - the basic metal.
In figure 4 microhardness distribution on a surface of a covering after everyone apparently is resulted.
а – after first annealing;
b - after second annealing;
c – after third annealing;
d – after fourth annealing;
d – after annealing;
Figure 4 – microhardness Distribution on covering Cr after everyone annealing.
Apparently from the resulted data, after the first annealing (figure 4а) makes microhardness of a covering 1300-1500 N/mm2 that practically does not differ from values of microhardness before heat treatment. After the second (figure 5b) – 800-1100 N/mm2, is observed small decrease in microhardness on covering section. After the third отжига (figure 5c) on the schedule of distribution of microhardness we see a wide spacing of the data. As much as possible often there are values of microhardness of an order 2100-3100 N/mm2. After the fourth annealing microhardness raises to values of an order 3500 N/mm2, and after the fifth decreases to 2000 N/mm2.
In figure 4 distribution of microhardness of copper on border with a covering after everyone annealing is resulted.
а – after first annealing;
b - after second annealing;
c – after third annealing;
d – after fourth annealing;
d – after annealing;
Figure 5 – Distribution of microhardness of copper on border with a covering after everyone annealing
Apparently from the resulted data, after the first annealingа (figure 5а) makes microhardness of copper 350-470 N/mm2 that practically does not differ from values of microhardness before heat treatment. After the second (figure 5b) – an order 280 N/mm2, is observed small decrease in microhardness of copper. After the third annealing (figure 5c) on the schedule of distribution of microhardness we see a wide spacing of the data. As much as possible often there are values of microhardness of an order 480 N/mm2. After the fourth annealing microhardness raises to values of an order 360-840 N/mm2, and after the fifth decreases to values of an order 260-530N/mm2.
On the received values of microhardness of a covering and the basic metal we build schedules of dependence of values of microhardness from endurance time (figure 6).
Figure 6 – Time influence annealing on microhardness of copper and chrome
As we see from the schedule (figure 6) that microhardness and copper and chrome till two o'clock endurance decreases, and then increases. At endurance 4 hours it is visible the maximum microhardness in both cases, and then again we observe microhardness decrease. By means of program Table Curve for the received data have picked up the equation describing these dependences:
 (1) (1)
In table 1 values of factors of the equation and statistical characteristics of the equation are resulted
Table 1 – Values of factors and statistical characteristics of the equation

As we see, dependences are described by one equation, though with different factors. The equations have big enough factors of determination and Fisher's criterion more tabular that says that the equation precisely enough describes both dependences.
| 

