Abstract
Content
- Introduction
- 1. Relevance of the topic
- 2. The purpose and objectives of the study
- 3. The problems solved by using photographic recording
- 4. Problems of measurement occurring during the photographic recording
- 4.1 Errors of the lens
- 4.2 Errors of the matrix
- 4.3 Errors in image processing
- 4.4 Errors of taking a photos
- 5. Control of flatness on the basis of photographic recording
- 6. Monitoring the availability of parts in the work zone machining centers
- Conclusion
- References
Introduction
Wide introduction machining centers in mechanical processing akes high demands to the diagnostically system of such equipment. The system must ensure the autonomy of the operation of the equipment within a certain period of time. Autonomy of work in particular implies a lack of control on the part of worker. Thus, for uninterrupted operation need to control not only the status of the nodes of the machine and the characteristics of the process of cutting workpieces, but also the work of the manipulators, mechanized equipment, automated system of cleaning of, etc.An integrated approach to the control of these devices can provide industrial photographic recording [1,2].
Industrial photographic recording is the process of registration of industrial processes in the production and control of the technological process with the help of photos. The process is part of the diagnostics of technological processes.
The improvement of algorithms for scientific photographs obtained through different filters, virtual studios, artificial vision systems allow you to remove noise, increase the sharpness of the contour, highlight the desired objects from a photo, define their motion vector.
Photocontrol allows for control of industrial production, in which TV devices allow contactless method to control the size and configuration of manufactured products for defects, etc., without delay or stop the production process. Diagnosis based on the photographic recording allows you to set how much the item is properly installed (the accuracy of the installation, alignment), to identify the error handler, the large deviations of the form (for example, large overhangs for details) [3].
1. Relevance of the topic
- photographic recording opens up broad prospects for the automation of production;
- photographic recording increasing productivity;
- photographic recording allows you to remotely control the correct performance of technological operations;
- photographic recording can be made during the transportation details (such as when moving through the assembly line);
- photographic recording helps reduce the production of a marriage;
- has sufficient photographic speed measurement;
- photographic recording and design characterized by simplicity, versatility and low cost.
2. The purpose and objectives of the study
The purpose of the work is to increase productivity and reduce defects in a flexible automated production through the introduction of photographic recording of technological processes.
Main tasks of the research:
- Analysis of the current state of diagnostic process, based on photographic.
- The method according to the definition of flatness of photographic recording.
- Photographic identification of opportunities.
- The introduction of photographic technique in the process of manufacturing products.
Object of research: technological process of manufacturing products in a flexible automated production.
Subject of research: quality control of manufactured products based on the photographic process.
3. The problems solved by using photographic recording
Photographic recording is fairly slow process. The time between two measurements is measured in seconds. Therefore, using photographic recording is not possible to register high-speed processes, such as accelerated moves of the working parts of the machine spindle speed control and detail, the movement fractured chips, etc. At the same time, photographic, due to the high resolution, allows you to control the size and arrangement of parts which are at rest. Thus, by using photographic recording in a flexible automated production is possible to perform:
- in the process of setting up processing center:
- the availability of automatic control of the installed equipment;
- control bar code of installed equipment;
- control of external equipment damage;
- monitoring the availability of the tool is automatically installed;
- control bar code installed equipment;
- compliance with the form tool bar-code;
- monitoring of tool wear;
- during installation / removal of items:
- control of the workpiece in the presence of the manipulator;
- control of harvesting in the manipulator;
- control of the workpiece when trapped in a snap;
- measurement of the geometry of the finished part;
- the transfer of control of the finished part manipulator;
- during processing:
- control of breakage of the tool;
- control of contamination of the working zone of the drain chips [4].
4. Problems of measurement occurring during the photographic recording
In the process of photographic difficulties which are caused by errors introduced by the lens cameras, matrix and other factors.
4.1 Errors of the lens
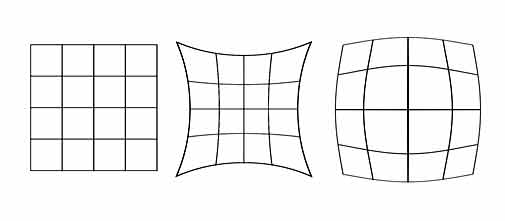
Fig. 1. – Optical distortion (origin: http://ru.wikipedia.org/wiki...)
Clearly marked example of the error is the distortion of the lens. Distortion (pincushion, barrel-shaped) - error in optical systems, in which a linear increase varies across the field of view lens distortion when there are errors in the control surface geometry, spatial variations, tolerances forms. Also, the errors of the lens is vignetting, chromatic aberration, coma, astigmatism [5,6].
4.2 The errors of the matrix
To errors introduced by the matrix include the noise of the matrix and its solution form.
The noise of the matrix is shown in color distortions, similar to the multi-coloreddots. This phenomenon is due to the random nature of electron motion in the phototransistor matrix. As a result, have difficulty with the definition of the boundaries of parts, there is a registration error of small items of parts [7].

Fig. 2. – The noise matrix (origin: http://images.yandex.ua/...)
To minimize this phenomenon is possible using photographic equipment to the large size of the matrix, selection of the optimal lighting and shooting modes, as well as the use of special software.
4.3 Errors in image processing
In image processing there are errors associated with the encoding in jpg format, and contrast enhancement algorithms. Giving rise to the emergence of the Moivre around the edges and the appearance of bright lines on the borders of the details. This phenomenon is due to loss of information during compression and the addition of contrast contours, which results in difficulties in determining the boundaries and details of its geometry.
These errors are reduced by the development of software algorithms for image processing
4.4 Errors of taking a photos
Also, when photographic errors arise directly connected with the shooting. These include: the glare from the backlight, position the camera at an angle to the workpiece, vibration chamber and the other, which leads to the appearance of white areas on the image, reducing sharpness, distortion of the geometric forms and details of the smearing of the edges of the image. This results in inaccuracies in determining the elements of detail, accuracy of measurement of dimensions and the like.
These inaccuracies are solvable by the development of software algorithms for image processing.
5. Control of flatness on the basis of photographic
In the manufacture of explosion-proof equipment enclosures having increased requirements to control the flatness of flanges processing. They are caused by the need to snug the lid to the body of the product. An example would be the enclosure of explosion-proof starter explosion proof. Dimensions of flange significantly increase the time to measure by traditional means. It is therefore proposed to carry out its monitoring methods photographic recording
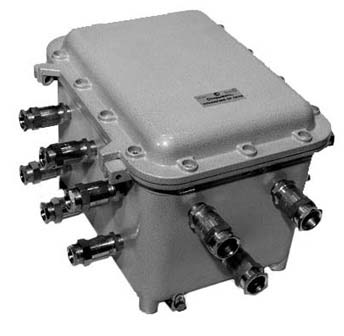
Fig. 3. – Case hardened starter (origin: http://images.yandex.ua...)
Check the flatness of the flange is possible using photographic-based light reflection. Thus, while moving the body through the transporter to get pictures with light at a certain angle. The light beam reflected from the surface finish and into the lens while taking into account the fact that the curved surface of the reflected light will be different (the angle of reflection of the light beam the other), we can talk about flatness (curvature) of the surface
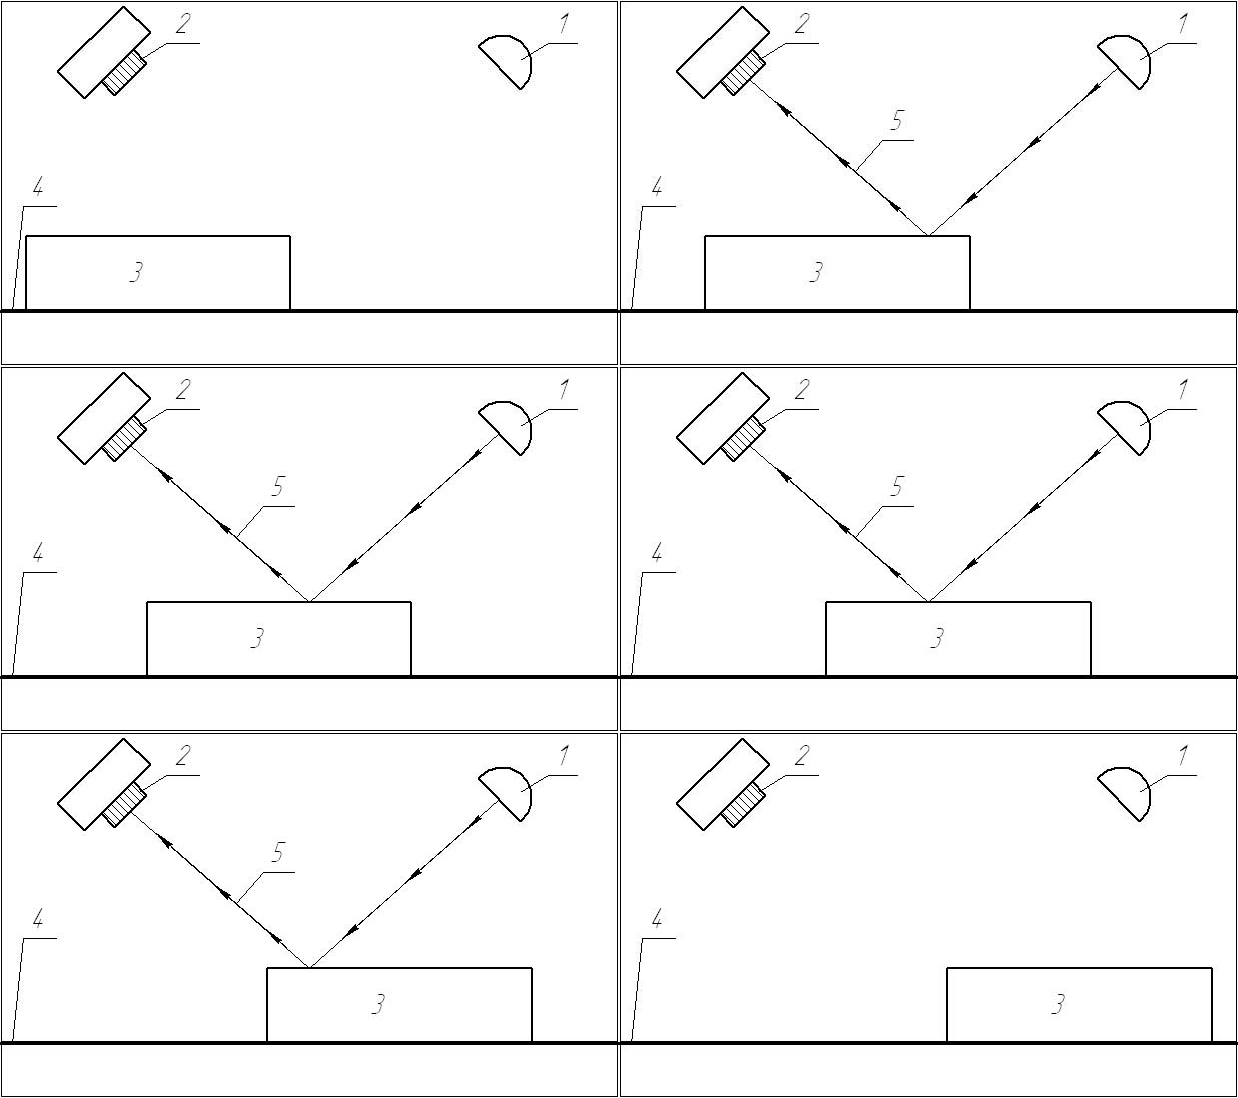
Fig. 4. – The physical process controls the flatness
1 – Light
2 – Camera
3 –Case
4 – Conveyor
5 – Light ray
6. Monitoring the availability of parts in the work zone machining centers
Monitor the availability of parts in the work area of processing centers may use an algorithm based on standard operations with the image.
For registration details of the reference picture is performed is guaranteed free from the details of the working area. After that begins the process of photographing one of the reference frame. Subtracting these photos from the reference image, we find the dark areas in the places where the frame is fully consistent with the reference. Using these dark areas as a mask for cutting out images from the reference pictures in the end we get an image only changes in the work area.
On the photos possible to calculate the availability of parts in the processing zone. To do this, count the number of filled pixels (area fill) and compared with the transverse area of ??the frame pictures. The calculation of the geometric center of the filled pixels will monitor the location of parts in the work area. More sophisticated image processing algorithms can yield information about the presence of bank details and line drawing of its shape.
Conclusion
With the help of photographic diagnosis can be made of technological processes, not only at the manufacturing center, but on the whole path of the details of the flexible automated site. The use of photographic allows you to increase product quality, reduce the number of failures of automation robots and machining centers, to reduce the number of marriage, to identify deficiencies of production. Its introduction into production will speed up the control of the geometric characteristics of machined parts. Developments in this area are very important in the development of mechanical engineering.
References
- Диагностика и неразрушающий контроль продукции машиностроения / ЦНИИ технологии машиностроения; науч. ред. В.И. Иванов. – М.: НПО ЦНИИТмаш, 1988. – 132с.
- Остафьев В.А. Диагностика процесса металлообработки / В.А.Остафьев, В.С. Антонюк, Г.С. Тымчик – К.: Тэхника, 1991. – 151с.
- Кулагин С.В. Аппаратура для научной фоторегистрации и киносъемки. 2-е изд., перераб. и доп. М.: Машиностроение. – 1990г. – 192с.
- Деревянченко А.Г. Система интеллектуального анализа изображений зон износа режущих инструментов / А.Г. Деревянченко, О.Ю. Бабилунга, Д.А. Криницын // Резание и инструмент в технологических системах. Международный научно-технический сборник. – Х., 2010. – С.75-80.
- Свет и оптические линзы. Исправление аберраций объективов и искажений изображения [Электронный ресурс] – 2007 – Режим доступа: http://www.photo-cams.ru... Заголовок с экрана.
- Энциклопедия физики и техники. Аберрации оптических систем. [Электронный ресурс] – Режим доступа: http://femto.com.ua/articles/part_1/0005.html - Заголовок с экрана.
- Цифровая фотография и качество фотоаппаратов. Дефект цифровых фотоснимков - шум матрицы фотоаппарата [Электронный ресурс] – 2008 – Режим доступа:http://camru.org... – Заголовок с экрана.
Remark! When I wrote this abstract, master's work is not yet completed. The definitive variant will be ready by December, 2012. Full text of work and materials on the subject can be obtained from the author or his adviser after that date.
