![[изображение]](../evstratov_big.jpg "DonNTU Master Evgeniy Evstratov")
Abstract of Master's thesis
Development and researching of methods of designing drivers under Windows NT
Brief contents
- Structure of drivers
- Driver's load function
- Driver's unload function
- Function of device creating
- Function of closing of device
- Dispatch function
- Communication with user's program
- Compiling
- Installation
- Introduction into interrupts
- Interrupt object
- Deferred procedure call (DPC)
- Experiments
- Conclusions
- Literature
Structure of drivers
Drivers have some standard functions, that have to be including into them and have a determined parameters.
First of them - driver's load function (entry point):
NTSTATUS DriverEntry (IN PDRIVER_OBJECT pDriverObject, IN PUNICODE_STRING RegistryPath)
The return value have type NTSTATUS
, that will be used often further. The name DriverEntry
is constant, compiler looking for that name same like for WinMain
in Windows application. System puts in DriverEntry the pointer to the driver object and the pointer to the Unicode-string, that contains a way to the driver in the system registry.
Lets notice that the way is in the Unicode format, it's usual in dirvers. In the DriverEntry we should conduct all initialization:
- Give a name to out driver in NT and WIN32 namespaces:
UNICODE_STRING uniNtName; // name in NT's namespace
UNICODE_STRING uniWin32Name; // name in WIN32's namespace
RtlInitUnicodeString(&uniNtName, L"\\Device\\NtMyDriver");
RtlInitUnicodeString(&uniWin32Name, L"\\DosDevices\\MyDriver");
Macros (L"string") makes a string in extended format. - Make a link between this names:
IoCreateSymbolicLink(&uniWin32Name, &uniNtName); - Create a (virtual) device, that we will work with:
PDEVICE_OBJECT pDeviceObject; // we are writing the driver on theC
-language, so we should replace the definitions of variables in the begin of the function.
IoCreateDevice(pDriverObject,0,&uniNtName, FILE_DEVICE_UNKNOWN,0,FALSE,&pDeviceObject);
In pDeviceObject will be placed a pointer to created device, that we won't use in that example; - Fill the pointers in the DriverObject struct, that will be needed for the work. Next functions can have random names, so lets make for them prefix
my
to not be confused.
pDriverObject->MajorFunction[IRP_MJ_CREATE] = myCreate;
pDriverObject->MajorFunction[IRP_MJ_CLOSE] = myClose;
pDriverObject->MajorFunction[IRP_MJ_DEVICE_CONTROL] = myDispatch;
pDriverObject->DriverUnload = myDriverUnload; - Return the success status:
return STATUS_SUCCESS;
In a failure situation we can return the code STATUS_IO_DEVICE_ERROR, then Windows will unload out driver.
Driver's unload function
VOID myDriverUnload(IN PDRIVER_OBJECT pDriverObject)
Don't retuan a value, takes a pointer to the driver object. This function will be called by Windows. We have to do here direct opposite things relatively to DriverEntry,
exactly - delete the symbolic link between names and delete the device object:
PDEVICE_OBJECT deviceObject = pDriverObject->DeviceObject;
UNICODE_STRING uniWin32NameString;
RtlInitUnicodeString( &uniWin32NameString, L"\\DosDevices\\MyDriver");
IoDeleteSymbolicLink( &uniWin32NameString ); // link is deleted now
IoDeleteDevice( deviceObject ); // device object is deleted now
Function of device creating
NTSTATUS myCreate(IN PDEVICE_OBJECT pDeviceObject,IN PIRP Irp)
Takes the pointer to the device object and the pointer to the IRP (Input/output Request Packet). In the most simple case we only have to finish the request:
Irp->IoStatus.Status=STATUS_SUCCESS; // request status
Irp->IoStatus.Information=0; // count of bytes to be transfered
IoCompleteRequest(Irp,IO_NO_INCREMENT); // request finishing
return STATUS_SUCCESS; // function completed successfully
Function of closing of device
NTSTATUS myClose(IN PDEVICE_OBJECT pDeviceObject,IN PIRP Irp)
Have a same signature with previous, and in the most simple way we doing the same things here.
Dispatch function
NTSTATUS myDispatch(IN PDEVICE_OBJECT pDeviceObject,IN PIRP Irp)
It takes the pointer to the device object and the pointer to the IRP. Here will be conducted all work with using of data buffers, for example:
PIO_STACK_LOCATION pIrpStack; // pointer to the IRP stack
PUSHORT pIBuffer, pOBuffer; // pointers to the input and output buffers
USHORT val;
pIrpStack = IoGetCurrentIrpStackLocation(Irp); // taking the IRP stack pointer
pIBuffer = (PUSHORT)(Irp->AssociatedIrp.SystemBuffer); // taking the pointer to the input buffer
pOBuffer = (PUSHORT)(Irp->UserBuffer); // and output
switch (pIrpStack->Parameters.DeviceIoControl.IoControlCode) // operation code
{
case IOCTL_MYCODE1: // codes is determined be the developer
val = *pIBuffer; // takes a word from input buffer
*pOBuffer = val*val; // making square and putting in the output buffer
Irp->IoStatus.Information=0; // count of bytes to be transfered (commented below)
break;
}
Irp->IoStatus.Status=STATUS_SUCCESS; // request completed successfully
IoCompleteRequest(Irp,IO_NO_INCREMENT); // completion of the request
return STATUS_SUCCESS; // function completed successfully
In this example the driver takes from the user a USHORT value and brings a square of it in same format. Count of bytes to be transfered
assings to zero, user will take this value as real count. here is important thing - before returning to the user's program this count
of bytes will be copied from input buffer (pIBuffer) to the output (pOBuffer) automatically. In that way with exchange method METHOD_BUFFERED
(commented below) we don't have to take the address of the output buffer and work only with input. Input buffer will be copied in system buffer
by Windows (and our data in user's program won't be erased) and indicate the count of bytes to be copied. The size of system buffer will be
maximum of indicated sizes of input and output buffers. Referencing to the system buffer out of it's bounds won't be usual Windows error,
we will got a BSOD (Blue Screen Of Death) and rebooting of Windows. So, for working with the system buffer important is not only to
allocate enough memory in user's program, but also correctly indicate their size.
The operation codes is defining by developer, forming with macro CTL_CODE( DeviceType, Function, Method, Access ) [7],
that brings a 32-bit value, this macro is defined in WinIoCtl.h (enough to include windows.h). The most interesting field here is
function code Function
, it have a length of 12 bits and should in in the range of [0x800, 0xFFF]. The values below 0x800 is
reserved for Windows [4]. Our operation code is making next way:
#define IOCTL_MYCODE1 CTL_CODE (FILE_DEVICE_UNKNOWN, 0x800, METHOD_BUFFERED, FILE_ANY_ACCESS)
All needed type and constant definitions is in the only including file:
#include "ntddk.h"
Communication with user's program
In common case work will look like:
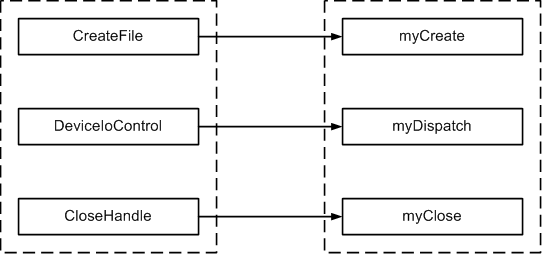
[Opening device] [exchange] ... [exchange] [closing device]. Accord between driver's and user's functions shown on figure 1

\\.\name, the function returns the device descriptor if succeeds, or INVALID_HANDLE_VALUE if fails. For our example:
HANDLE hDrv;
hDrv = CreateFile("\\\\.\\MyDriver", GENERIC_READ | GENERIC_WRITE, 0, NULL, OPEN_EXISTING, FILE_ATTRIBUTE_NORMAL, NULL);
The last parameter is pointer to the
templatethat for driver can be additional description of the device. We put here NULL thet means it's not used, because we have only one device.
Dispatch function [6]:
BOOL WINAPI DeviceIoControl(
HANDLE hDevice, // descriptor of our device
DWORD dwIoControlCode, // operation code
LPVOID lpInBuffer, // pointer to the buffer of data to be send to the driver
DWORD nInBufferSize, // size of this buffer
LPVOID lpOutBuffer, // pointer to the buffer for data to be recieved
DWORD nOutBufferSize, // size of this buffer
LPDWORD lpBytesReturned, // pointer to the variable that will take a count of transfered bytes
LPOVERLAPPED lpOverlapped); // extended parameter
For our example both buffers should have size of 2 bytes (one USHORT variable), lets do exchange:
USHORT toDriver = 5,fromDriver;
DWORD cbRet;
DeviceIoControl(hDrv,IOCTL_MYCODE1,
&toDriver,2,&fromDriver,2,&cbRet,NULL);
Now variable 'fromDriver' contains value 25.
Function of device closing takes the only parameter - device descriptor:
CloseHandle(hDrv);
Now device is closed and we can't use it by descriptor hDrv.
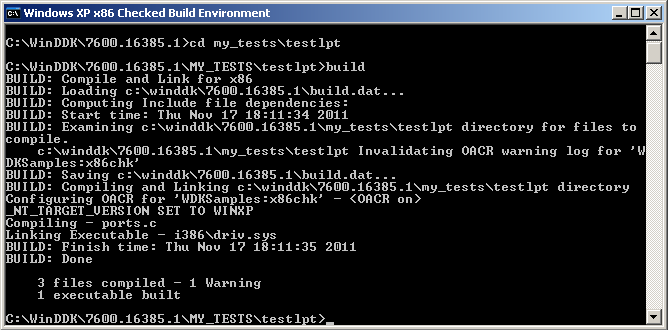
Compiling
For drivers compiling we have to install the package Windows Driver Development Kit (WinDDK). Package runs as console application (figure 2).

Checked Environmentmeans debug compiling,
Free- release. After running it we are in the main directory of the WinDDK, from where we have to get to the prepared directory of our developing driver with commands
cd, and enter the command 'build' [5]. In the case of success we will got the message
1 executable builtin the end, and in one of subdirectories created by WinDDK we will got the driver's executable file with *.sys extension. In our example it's in the subdirectory
i386, what determines by the row
Linking Executable - i386\driv.sys. If case of failure we will take a list of errors here. Lets move to the our driver directory. It have to contain the files:
makefileand
sources(without extension). Content of
makefileis constant, and it have to be compied from some example that attached to the package (for this version for example in
WinDDK\7600.16385.1\src\input\HBtnKey\) File
sourcescontains information about the input and output files of the project, for example:[3]:
TARGETNAME=driv - name of the output file (will be with .sys)
TARGETPATH=C:\WinDDK\7600.16385.1\MY_TESTS - directory
TARGETTYPE=DRIVER - type of object to create - driver
SOURCES=driv.c - driver's source code file
Compiling example (screenshot) is shown of the figure. 3.
Installation
Installation can be static or dynamic. Static installation conducts on startup of Windows and should be used for completed drivers.
In case of dymanic installation the install and uninstall can be made in any moment, it usefull for debugging.
For static installation the driver's executable file have to be placed in the directory windows\system32\drivers
. Then creates
the directory in the system registry with the address HKEY_LOCAL_MACHINE\System\CurrentControlSet\Services\
with name
of driver's executable file. In created directory then creates four parameters (keys) that descripted below. It can be done with
regedit
or with *.reg file, that have to contain the next data:
REGEDIT4
[HKEY_LOCAL_MACHINE\System\CurrentControlSet\Services\driv]
"Type"=dword:00000001
"Start"=dword:00000002
"ErrorControl"=dword:00000001
"Group"="Extended Base"
Where driv
was name of file of our driver. Space after the first row is necessary. Indicated way to the file of driver
is standard, but can be indicated different from it, for that have to be created additional string parameter ImagePath
,
that contains a full path. This *.reg have to be executed with left mouse doubleclick, Windows will ask for a confirmation
to adding an information in the registry and them will bring a message of successfull addition.
For dynamic installation we need to create a program - installer (or do the below commands in our testing application code).
In the registry drivers were descripted as a services, next method is based on opening the service manager and direct installing.
Lets see it on example [1].
First of all we need to open the service manager:
SC_HANDLE scm = OpenSCManager(NULL,NULL,SC_MANAGER_ALL_ACCESS);
if(scm == NULL)
return -1; // fail
Next - installing the driver - creating the service:
SC_HANDLE Service = CreateService(scm, // opened descriptor of SCManager
"Driv", // service name – Driv
"Driv", // name to display
SERVICE_ALL_ACCESS, // desired access - full
SERVICE_KERNEL_DRIVER, // service type – kernel driver
SERVICE_DEMAND_START, // running type – demanded
SERVICE_ERROR_NORMAL, // errors processing
"C:\\driv.sys", // path to file of driver
// rest parameters is not used - put NULL
NULL, NULL, NULL, NULL, NULL);
if(Service == NULL) // fail
{
DWORD err = GetLastError();
if(err == ERROR_SERVICE_EXISTS)
{/* the driver is already installed */}
else
return -1; // other error
}
Further we have a two cases - or service was created successfully and we got his descriptor, or service was already
installed we didn't got a descriptor. For second case we have to open it, on common case we can just close and open it:
CloseServiceHandle(Service); // closing the service
Service = OpenService(scm, "Driv", SERVICE_ALL_ACCESS); // opening the service
if(Service == NULL)
return -1; // error of opening
Теперь запускаем сервис:
BOOL ret = StartService(Service, // service descriptor
0, // count of parameters (no one in our example)
NULL); // pointer to the parameters (not using)
if(! ret) // fail
{
DWORD err = GetLastError();
if(err == ERROR_SERVICE_ALREADY_RUNNING)
{ /* driver has been already runned */ }
else
{
ret = DeleteService(Service); // deleting (unloading) the driver
if(!ret)
{ /* unload fails */ }
return -1; // running error
}
}
Now we can work with our driver. After finishing work we have to stop
itand unload. Stopping the driver:
SERVICE_STATUS serviceStatus;
ret = ControlService(Service, SERVICE_CONTROL_STOP, &serviceStatus);
if(! ret) // fail
{
DWORD err = GetLastError();
// we can make a detail diagnostic here
}
Unloading the driver:
ret = DeleteService(Service);
if(! ret)
{ /* deleting fail */ }
CloseServiceHandle(Service); // closing the service
Now the driver is entirely deleted from Windows.
Introduction into interrupts
Procefures of interrupt processing is named ISR (Interrupt Service Routine). In Windows all tasks have a priorities, in chain of priorities user's programs got the most lower place. Next after them is kernel mode programs (drivers e.t.c). Next and higher priorities have interrupts [2]. Because of it interrupt procedures almost don't give a processor time for others, that can make negative incluence on the system. So the DPC's (Deferred Procedure Call) were introducted. They belongs to kernel level programs. So if processing could take much time, it replaces into the DPC, while ISR only leaves a request on it call. DPC's is attaches to the device objects. Requests to their calls makes directly with appropriated device objects. For interrupts were introducted special objects, that needed to attach and detach to ISR. If you attaching ISR to interrumpt unloading driver without detaching it then with next appropriated interrupt there will be error of memory access and most likely the system will reboot.
Interrupt object
Interrupt objects describes with struct KINTERRUPT, that creates by function of attaching interrupt to the handler -
IoConnectInterrupt. Function takes the hardware interrupt vector and interrupt level. Lets see on example.
We are in the DriverEntry, already registred the device, attaching interrupt handler:
KAFFINITY Affinity; // struct, that respose for attaching to the logical processor
ULONG MappedVector; // hardware interrupt level
PKINTERRUPT pInterruptObject; // pointer to the interrupt object
ULONG InterruptLevel = 7; // IRQ7
KIRQL irql = InterruptLevel; // hardware level of using interrupts
MappedVector = HalGetInterruptVector(Isa, // system bus type - ISA
0, // bus number
InterruptLevel, // bus interrupt level
InterruptLevel, // bus interrupt vector (for Isa – same with previous)
&irql, // interrupt level – output parameter
&Affinity); // attaching to processor – output parameter.
// hardware interrupt level has been taken, attaching handler
NTSTATUS status; // attaching status
status = IoConnectInterrupt(&pInterruptObject, // pointer to the interrupt object - output parameter
IsrRoutine, // our ISR
pDeviceObject, // additional parameter for ISR call
NULL, // spin-lock - not using
MappedVector, // hardware vector
irql, // interrupt level
irql,
Latched, // interrupt type - latched
FALSE, // not public vector
Affinity, // attaching to processor
FALSE); // don't save FPU and MMX registers before call
if(status != STATUS_SUCCESS)
{ // fail
}
else
// success, now the interrupt is attached to ISR.
Here we attached ISR to IRQ7 of bus ISA(0), that commonly accords to ports LPT1, LPT2.
After finishing we have to detach interrupt:
IoDisconnectInterrupt( pInterruptObject ); // function don't return a value
The ISR function have to had the next signature:
BOOLEAN IsrRoutine(IN PKINTERRUPT pInterrupt,IN PVOID pContext);
It takes the pointer to the interrupt object (that allows to detach it right here), and device context
-
a pointer without a type, it's that additional parameter for ISR call, that has been indicated in the
IoConnectInterrupt call. In this example it's pDeviceObject.
Deferred procedure call (DPC)
DPC is attaching to the device object, as has been noticed before:
IoInitializeDpcRequest(pDeviceObject, // pointer to the device object
DpcRoutine); // our DPC
Function don't return a value. DPC have to had the next signature:
VOID DpcRoutine(IN PKDPC Dpc,IN PDEVICE_OBJECT pDeviceObject,IN PIRP pIrp,IN PVOID pContext);
It takes a struct, that contains a information about the deferred call, device object that it attached to,
the pointer to the IRP and the additional parameter on developer choice.
Now we can make a request for the call by next way:
IoRequestDpc(pDeviceObject, // pointer to the device object
NULL, // pointer to the IRP – not using
NULL); // our additional parameter - not using
Now DPC is putted in the queue and waiting for call. As you can see - the only mandatory parameter is
pointer to the device object, without it it's unknown what to call. If you will put needed data into
the device extension then you almost don't need to use the rest parameters.
Experiments
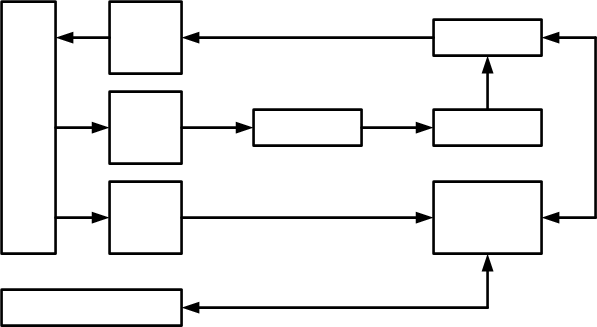
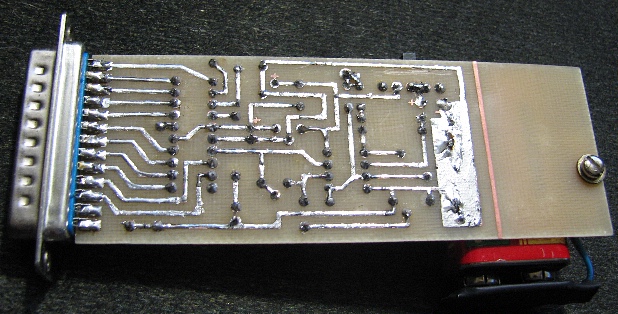
There were creaeted a device, that generates a random numbers by PC requests. It connects with port LPT1 and using the interrupt IRQ7 from an example above. For effective work driver leaves a request of generating a new number and brings control to the Windows without waiting of device to be ready. LPT port works on a frequency about 100 khz, and device only about 15 khz. When device is ready, it sets data and generates an interrupt, taht processing like described above. Scheme of communications shown on figure 4.
Cycled buffer used for comfortable simultaneous reading and writing in it for the case if in moment of reading by program the interrupt will come. In that way buffer have not only a length, but also a beginning (tail). Buffer is reads from the tail, while writes from the head. The head after reaching the end of buffer replaces to the start of it (zero offset), same like keyboard buffer in MS DOS.
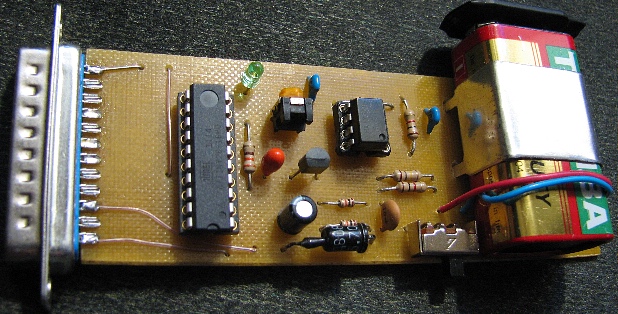
Initially data register of LPT port was provided for writing by PC only, and respectively reading by external device. Thats why here is used bidirectional mode of data transmission - sets EPP port mode in the bios. Device photos shown on figures 5,6.
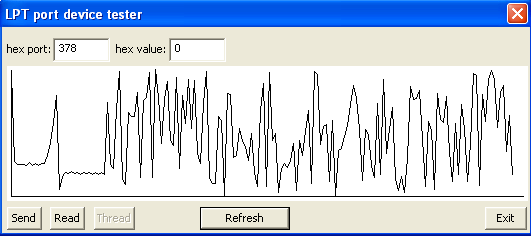
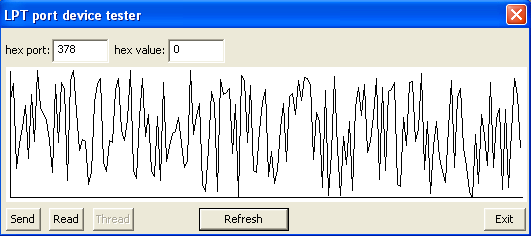
Testing program paints a graphic of taken numbers, connecting it with lines. The dots to connect are accords to the numbers values and displays with an interval of 3 pixels. In the start of work of device there always some initialization (small scatter of the values) with length of about 10-15 numbers, that is about 1 millisecod after first request to device. After turning off the power controller is still works, taking +5v from LPT port, but the rest part of the scheme can't work normally. The ADC brings a data sequence that loonks like rectangle impulses. Judging from this in some cases is not necessary to have an additional power, depending from the scheme. Intermediate reading data port showed that between requests the value in the port is not changing, as in have to be - buffer fills quickly, device waits for requests from driver and driver waits for requests from user's program.
Conclusions
On actual moment there was conducted analysis of structure of Windows NT drivers, was developed and implemented the device that connects to the LPT port, has been written a driver of it and made a tests that confirmed correct work of both of it. On actual moment the master's work isn't finished yet. Planed finishing time is december 2012. The further plans is developing of USB device driver and expanding the methodic of driver writing.
Literature
- Солдатов В.П. Программирование драйверов WINDOWS, Изд. 2-е, перераб. и доп. – М.: ООО
Бином-Пресс
, 2004 г. – 480 с: ил. - Рудаков П.И, Финогенов К.Г. Язык ассемблера: уроки программирования. – М.:Диалог-МИФИ, 2001. – 640 с.
- Пишем первый драйвер. Часть 1. Internet resource. Access mode: http://www.pcports.ru/articles/ddk2.php
- Пишем первый драйвер. Часть 2. Internet resource. Access mode: http://www.pcports.ru/articles/ddk3.php
- Пишем первый драйвер. Часть 3. Internet resource. Access mode: http://www.pcports.ru/articles/ddk4.php
- Тестируем драйвер на практике. Internet resource. Access mode: http://www.pcports.ru/articles/ddk5.php
- Общая архитектура Windows NT. Internet resource. Access mode: http://www.tisbi.org/resource/lib/Eltext/BookPrSistSecurity/Glava%202/GL2.htm