Abstract
Content
- Introduction
- 1 Theme urgency
- 2 Goal and tasks of the research
- 3 Influence of the temperature factor on the formation of a defective layer of sitalls during grinding
- Conclusion
- References
Introduction
Criap nonmetallic materials (СNM), which include technical ceramics and glass ceramics, are used as construction materials in various fields of technology. The physical and mechanical properties of these materials exceed metals in terms of heat resistance, wear resistance, corrosion resistance, chemical resistance, despite, that metals are used as basic materials for the manufacture of parts in engineering.
When processing CNM, including sitalls, the accuracy of the machined parts depends significantly on the thermal and force phenomena that occur in the cutting zone. This is due to the interaction of the working grains of the circle with the surface of the part. By analogy with metals, it can be assumed that the physical and mechanical state of the surface layer of products is affected by processing conditions, and to a large extent by the level of forces and temperatures characteristic of grinding.
1 Theme urgency
The world trend in the development of engineering industries, including machine building, is aimed at pushing out metal parts and structural elements, replacing them with cheaper and more functional non–metallic materials. The technology of blanking operations of products from sitalls is imperfect. The required accuracy of the dimensions and the surface quality of these products, necessary for their use as parts and responsible structures, can only be achieved with the use of machining. Large allowances assume a large number of operations. The main method of processing sitall is grinding. Processing is accompanied by force and temperature loads on the material being processed and, as a result, the development of the defective layer.
If the effect of forces on the output parameters of the cutting process has been studied, the influence of the temperature factor on the formation of a defective layer of the satallites in abrasive processing has not been practically studied.
2 Goal and tasks of the research
Goal of the research to investigate the influence of the temperature factor and the temperature distribution in the surface and near–surface layers of articles made from brittle nonmetallic materials, in particular sitalls, during diamond grinding.
Main tasks of the research:
- Determine the effect of the grinding mode, tool characteristics, composition of the LCM, which determines their surface activity with respect to the material being processed, the features of the grinding process and the quality of the treated surface.
- Determine the degree of influence of previously unexplored temperature factors accompanying the mechanical processing of the sitalls, on the quality (defectiveness) of the surface being formed.
- Theoretical and experimental methods determine the level of temperatures occurring in the cutting zone, and the effect on this factor of the parameters of the regime and processing conditions, including LCL.
- Determine the temperature distribution in the billet body from the sitalls under various machining conditions. Using the software complex SolidWorks, to simulate the process of diamond grinding and compare the data on the distribution of temperatures in the surface and near–surface layers of the billet.
Research object: the technological process of diamond–abrasive grinding of products made of sitalls.
Research subject: the temperature factors that affect the formation of a defective layer in the diamond grinding of articles from glass, as well as the distribution of temperatures in the surface and near–surface layers.
3 Influence of the temperature factor on the formation of a defective layer of sitalls during grinding
The influence of the temperature factor on the formation of the defective layer of the sital is hardly studied in abrasive processing, although it is known that the stresses during cutting σ cut do not remain equally constant during the abrasive treatment, but depend on the contact conditions of the material being processed with abrasive grain tools. In the general case [ 6 ]
where σ a are the stresses arising from the cutting forces; σθ – the stresses arising from the temperature changes in the surface layer (thermoelastic stresses).
The questions of the influence of the temperature arising during the grinding of materials on the defectiveness of the treated surface were investigated by a number of authors [7, 14, 15, 16, 17].
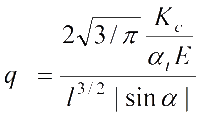
According to the data of the work [18], the development of cracks – defects in the processed material during grinding is determined by the level of thermoelastic stresses, which, in turn, depend on the limiting value of the heat flux, determined, according to [3]

where αt is the coefficient of linear thermal expansion of the material under study; Kc – a constant characterizing the resistance of the material to the development of a crack; E – Young's modulus of OM; α и l is the orientation angle and the length of the initial crack–defect.
In addition, it is believed that the maximum temperature in the zone of interaction of the circle with the machined surface of the sital under normal conditions of the cutting process does not exceed 450–500°С. It is known that the calipers, having a high thermal inertia due to their low thermal conductivity, can withstand temperatures up to 1000°С under conditions of short–term high–temperature uneven heating (which corresponds to the conditions of the abrasive process), since these materials are characterized by high thermal inertia due to their low thermal conductivity. It is of considerable interest to determine the nature of the propagation of temperature fields in the body of the article under various processing conditions, as well as the effect of temperature, forces, and process conditions (cooling presence) on the defectiveness of the formed surface.
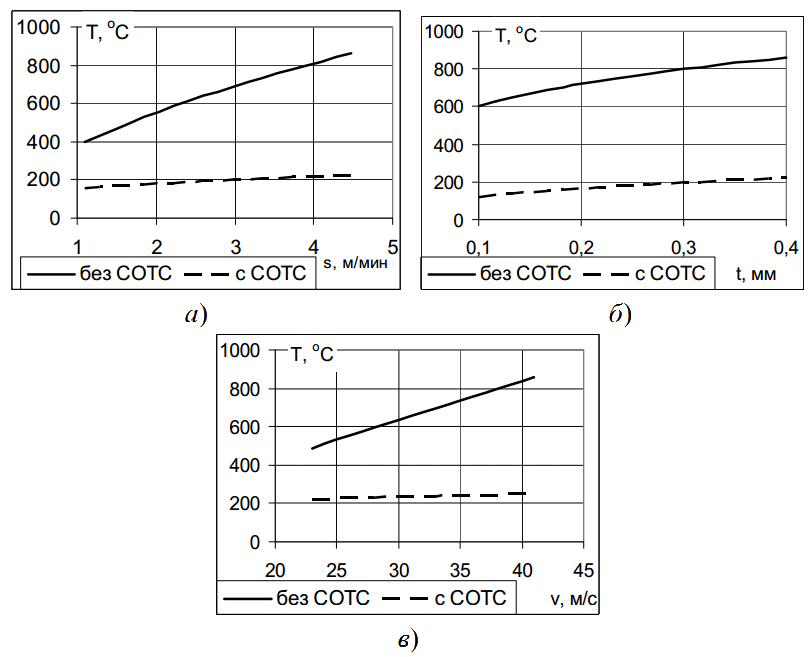
In the course of the experiment, according to the planar grinding scheme, the AS–41 satall was machined. The machining was carried out on a 3672 machine using the circle 1A1 200x10x3x76 A 250 / 200–4–M2–01. As an SDS, an aqueous solution of soda ash with 10% oil was used. During processing, the parameters were varied: the speed of the circle vк = (23 – 41) m / s; feed rate s = (1,1 – 4,47) m / min; depth of cutting t = (0,1 – 0,4) mm. Formulas for the temperature dependences obtained in the zone of contact of the circle with the processed samples and the cutting force components from the processing regimes are given in Table. 1.

Table 1. Formulas for calculating the temperature and component forces of cutting during grinding [13]
The most unfavorable are investigated – maximum in terms of the level of temperatures and cutting forces – processing conditions, since in these cases there is the greatest danger of the development of structure defects, which can lead to the marriage of the workpiece. The obtained dependences of contact temperatures and components of the cutting force for flat grinding of the strainer for the most unfavorable processing conditions are shown in the figure. 1.

Figure. 1. The influence of the treatment regimes on the temperature in the grinding zone during the processing of the strainer with cooling and "dry". Processing modes: а) vк =41 m/s, t=0,4 mm; б) vк =41m/s, s=4,47 m/min; в) s=4,47 m/min, t=0,4 mm [13]
The above dependences show that an increase in the depth of cutting has a greater effect on the temperature rise in the treatment zone than the increase in feed.
As follows from the obtained data, the use of LCL, which reduces the temperature in the treatment zone, ensures a reduction of cutting forces, on average by 20%. This should have a positive effect on the parameters of the defective layer, disturbed by the treatment, which was verified on samples ground in appropriate conditions.
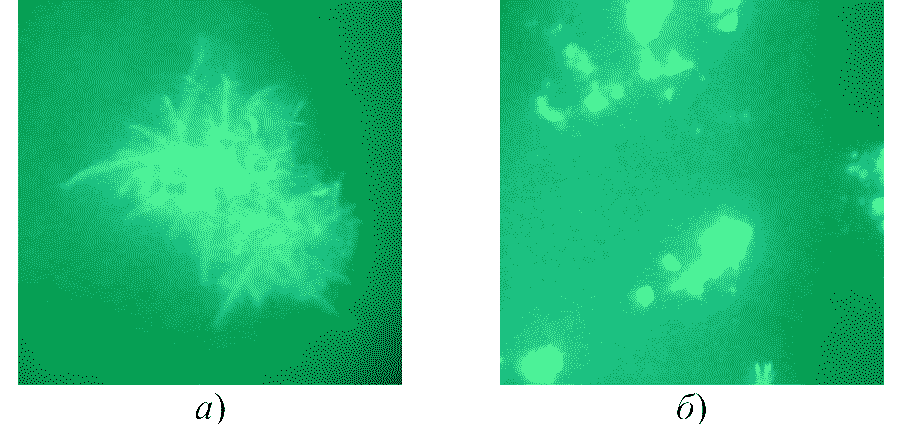
For a qualitative assessment of the effect of grinding conditions and the conditions of the cutting process on the surface defect, a study was made of the processing defectiveness of the experimental samples by the method of luminescent defectoscopy in combination with the layer–by–layer chemical etching of the ground samples at different levels, up to the point of reaching the surface not damaged by treatment [19]. The method consists of layer–by–layer etching (after 20 microns) and observing the processing defectiveness with photographing each of the layers until the processing defect disappears and the structural defect begins to appear.
Etching was carried out using a solution of a mixture of acids HF, H 2SO4, HCl, while the unthreaded side was protected with a heated paraffin solution. After etching with solvents, a layer of paraffin was removed and the sample was washed abundantly with running drinking water. The samples so treated were immersed in a fluorescent liquid of LV–6A and held for one hour at a temperature of 15 ° C, then rinsed again in large quantities of running potable water and dried in a stream of hot air for 30 minutes. The obtained samples were placed on the subject table of the luminescent microscope "Lyumam" and the processing defectiveness was observed. With the help of a digital camera OLYMPUS photographed the resulting image.
In Figure 2 [13] shows the images of the processing defect made at a depth of 100 microns relative to the surface of grinding, corresponding to different modes and processing conditions.

Figure 2. Processing defects. Pictures taken at a depth of 100 microns relative to the surface of grinding [13]
Reduction of defectiveness is associated with the beneficial effect of cooling, lubricating abilities, and with the important in the treatment of HNM, the property of LCL–dispersing [20].
However, in the works under consideration, no information is provided on the level of temperatures that arise in the samples at a depth of 100 microns and deeper, which does not allow us to make an unambiguous conclusion about the influence of the grinding temperature, and not the dispersing properties of LCL, on defectiveness.
Conclusion
It is planned that in the course of my master's thesis, the nature of the temperature distribution in the body of the articles from the ceramic will be established during their processing, and it will be possible to quantify the temperature arising during grinding at any depth.
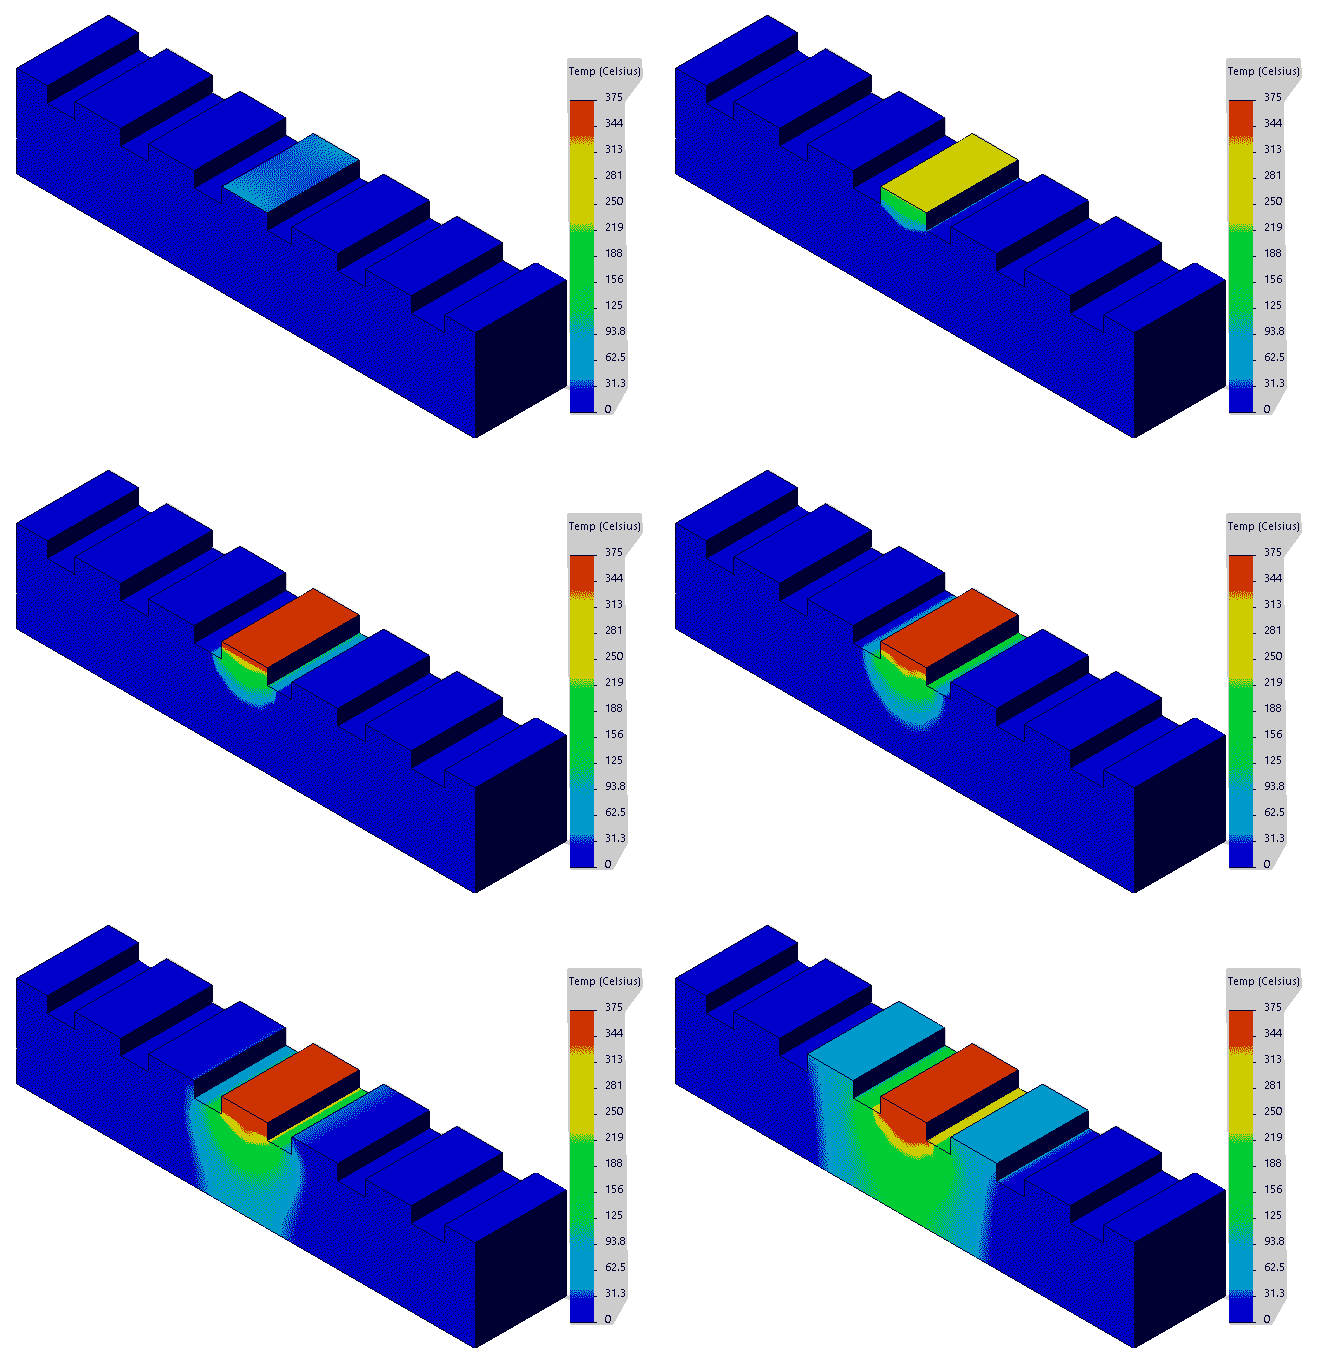
Using the SolidWorks software packages, we recreate the billet from the AST–418 chiller. We model the diamond grinding process and conduct a thermal investigation of the machining. In Fig. 4 shows shots of temperature distribution in the preform of the ceramic made on the thermal imager FLIR C2. Comparing the data of the physical experiment with the simulated one, it becomes possible to quantify the temperature arising during grinding at any depth.
In Figure 3 presents an animated thermal study of the sitalls with random input parameters.

Figure 3. Temperature distribution in the body of the workpiece from the sitall during diamond grinding (theoretical model).
When writing this essay, the master's work is not yet complete. Final completion: July 2018. The full text of the work and materials on the topic can be obtained from the author or his supervisor after the specified date.
References
- Griffith A.A. The theory of rupture. Proc. First Int. Cong. Appl, Mech. 1924. – p. 55–63.
- Irwin G. Analysys of Stress and Strains near the End of a Crack Traversing a Plate//J. Appl. Mech. 1957.– №3.– P. 361–364
- Boccaccini A.R. The Relationship between Wear Behaviour and Brittleness Index in Engineering Ceramics and Dispersion–Reinforced Ceramic Composites //Interceram. – 1999. – Vol. 48, No. 3. – P. 176 – 187.
- Advanced ceramics: evaluation of the mechanism of stock removal and ground surface quality/ E.C. Bianchi, C.E. da Silva, P. R. Aguiar, I. D. Valarelli, R. D. Monici // J. Braz. Soc. Mech. Sci. – 2001. – Vol.23, No. 1. – P.1–18.
- Ваксер Д. Б. Алмазная обработка технической керамики / Д. Б. Ваксер, В. А. Иванов, Н. В. Никотков, В. Б. Рабинович. // Л.: Машиностроение, Ленингр, 1976. – 160 с.
- Гусев, В. В. Влияние хрупкого разрушения материала припуска керамики на формирование микрорельефа поверхности детали при алмазном шлифовании / В. В. Гусев. // Наукові праці Донецького національного технічного університету. Серія: машинобудування. Випуск 1 – Донецьк, ДонНТУ, 2004.
- Кузин В.В. Технологические особенности алмазного шлифования деталей из нитридной керамики/ В.В. Кузин // Вестник машиностроения. – 2004. – №1. – С. 37–41.
- Калафатова, Л. П. Влияние охлаждения на температурные и силовые параметры процесса шлифования, а также на качество поверхности ситаллов при различных режимах резания. / Л. П. Калафатова, С. А. Поезд. // Надійність інструменту та оптимізація технологічних систем. Вип.23. 2008.
- А. В. Балыков. Эффективная обработка хрупких неметаллических материалов/ А. В. Балыков, А.Б. Липатова // Вестник МГТУ
Станкин
– 2008/ – №2. – с. 14 – 19. - В. П. Бахарев. Оптимизация процессов алмазной обработки керамики на основе системного анализа / В. П. Бахарев, А. С. Верещака, М. Ю. Куликов, С. Л. Леваков // Вестникдвигателестроения – 2008. – №1. – с. 96 – 98
- Калафатова Л.П. Исследование точности формообразования изделий из ситаллов при шлифовании / Калафатова Л.П., Поколенко Д.В., Феник Л.Н. // Электронный архив – Донецк, ДонНТУ
- Гусев В.В Влияние хрупкого разрушения материала припуска керамики на формирование микрорельефа поверхности детали при алмазном шлифовании // Электронный архив – Донецк, ДонНТУ
- Калафатова, Л. П. Влияние охлаждения на температурные и силовые параметры процесса шлифования, а также на качество поверхности ситаллов при различных режимах резания. / Л. П. Калафатова, С. А. Поезд. // Надійність інструменту та оптимізація технологічних систем. Вип.23. 2008.
- Ларшин В. П. Интегрированные технологические системы в машиностроении / В. П. Ларшин // Тр. Одес. политехн. ун–та. – Одесса, 1999. – Вып. 3(9). – С. 55 – 58.
- Кузин В. В. Работоспособность режущих инструментов из нитридной керамики при обработке чугунов / В. В. Кузин // Вестник машиностроения – 2004. №5. С. 39–43
- Журавлева Н. В. Керамика на основе нитрида кремния/ Н. В. Журавлева , Е. С. Лукин // Огнеупоры – 1993 – №1.– С. 6–11.
- Теплофизика механической обработки: Учебн. пособие / А. В. Якимов, П. Т. Слободяник, А. В. Усов. // К.; Одесса: Лыбидь, 1991.–240 с.
- Молчанов А.Д. Формирование поверхностного слоя изделий из оксидной керамики при алмазном шлифовании. Автореферат по диссертации кандидата технических наук: 05.03.01. / А.Д. Молчанов. // Донецк: ДонГТУ, 2001.
- Калафатова Л.П. Диагностика дефектности обработанной поверхности технических ситаллов / Л.П. Калафатова, В.В. Гусев, А.Д. Молчанов, Д.В. Поколенко // Прогрессивные технологии и системы машиностроения: Междунар. сб. начн. Трудов. – Донецк: ДонГТУ. – 1997. – Вып. 4. – С. 66–75.
- Калафатова Л. П. Технологические среды как способ интенсификации процессов механической обработки стекломатериалов /Л.П. Калафатова, С.А. Поезд // Прогрессивные технологии и системы машиностроения. – Донецк: ДонГТУ. – 1996. – Вып. 3. – С. 25–37.

