Summary of the final work
Content
- Introduction
- Main Part
- Perspective design
- Conclusions
- List of sources
Introduction
The characteristics of the collet chuck (Fig. 1) are determined by the parameters of the clamping collet and the conditions for its interaction with the spindle or the body of the cartridge and the workpiece, the deviations Δd of the diameter d of the clamped workpiece from the diameter of the working hole of the collet d0 (Δd=d–d0), and also clamping. Experimental studies have shown that when the cartridge parameters change, some clamping characteristics improve, while others deteriorate. Therefore, the choice of the main elements of the collet chuck in each case should be based on the dominant requirements
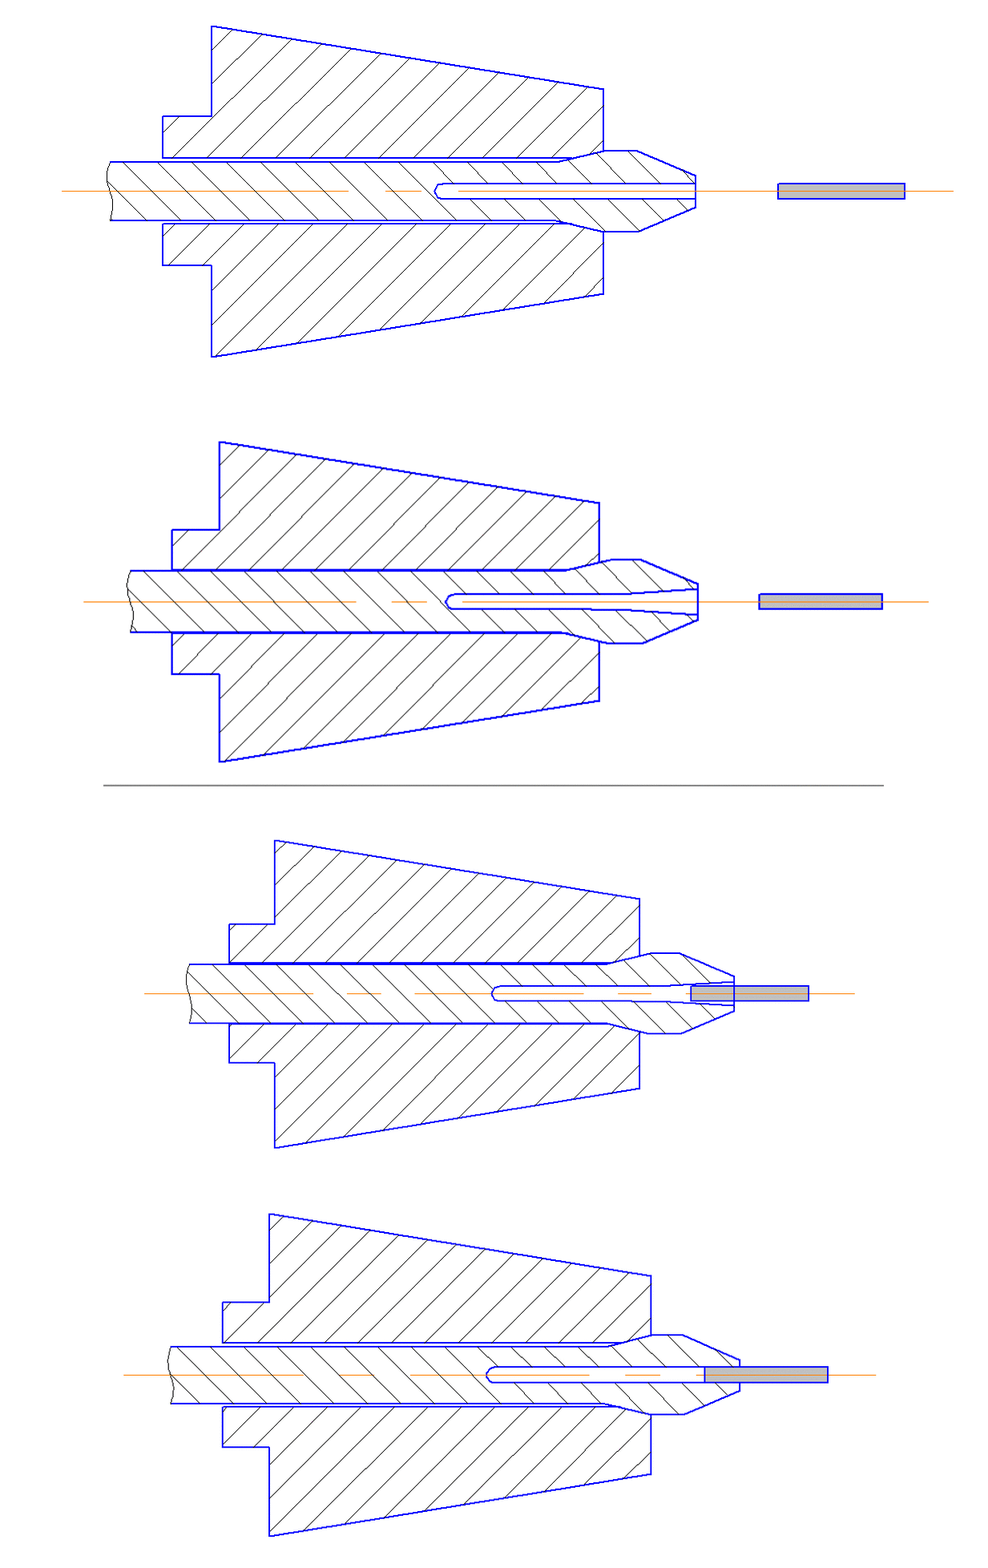
Fig. 1. Collet clamp (number of frames – 4, repetitions – 5, 100 kilobytes)
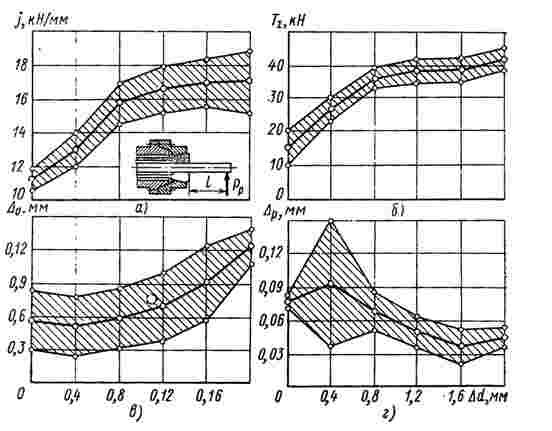
Fig. 2. Dependencies of the force characteristics of the clamping mechanism on the deviations of the diameter of the workpiece at / = 100 mm and Pp = 7.5 kN
Main part
The oscillations of the power characteristics of the entire clamping mechanism are determined by the resulting deviations of the power characteristics of both the drive and the cartridge. Charts of the characteristics of clamping chucks with long collet, given in fig. 2, obtained on the basis of the tests of five turning-turret machines 1341 with constant axial force S Δ tightening of the collet created by the hydraulic cylinder at an oil pressure of p = 1.2 MPa, and different values of deviations of the diameter of the workpieces from the diameter of the working hole of the collet Δd. Stiffness / depended on the ratio of the radial force Pp, applied at a distance I from the end of the collet to the clamped mandrel, to the spin value in the direction of the action of this force. The total radial clamping force 7s was measured with a collet dynamometer.
s Δd increases, the stiffness increases /, the clamping force T∑ and the amount of retraction Δ0 of the workpiece when clamping, and the radial runout Δ p of the clamped mandrel (at a certain distance from the end of the collet) decreases.
The results of experimental studies of radial rigidity and accuracy of clamping workpieces of different diameters in the chuck with a long collet and positive locking showed that there is a correlation between the radial rigidity of the workpiece clamp and radial accuracy (Fig. 3).
With an increase in clamping stiffness, the radial beats of Δp decrease, and more noticeably with increasing bar diameter. When fixing the rod, the diameter of which is slightly higher than the diameter of the working hole of the collet, the rigidity and radial accuracy are maximum, since in this case the most complete contact of the collet with the spindle and the workpiece is ensured. The accuracy of the clamping of the bar in diameter when d is lower, because the contacting of the collet with the spindle occurs at the edges of the sponge (at the slits). As a result, the main factor affecting the accuracy of fastening is the inaccuracy of manufacturing the collet, in particular, the inaccuracy of cutting along the angle.
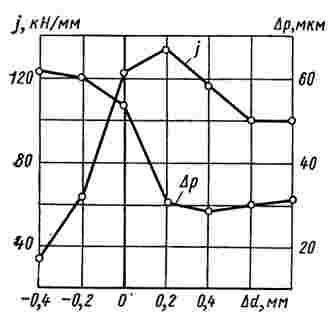
Fig. 3. Dependence of rigidity and accuracy of the clamp on the deviations of the diameter of the workpiece.
Analysis of the machining dimensions of a batch of stepped parts with a drilled hole (Fig. 4) showed the influence of the characteristics of the clamping mechanism and, in particular, the clamping force and rigidity of the collet chuck, on the machining accuracy. Studies were carried out at different clamping forces (changes in oil pressure p), bar diameters d (27 and 28 mm), spindle speeds n and sponge lengths (clamp base). After processing the parts, the measured: delta-ration of the wall thickness, as the difference between the maximum and minimum wall thicknesses at the beginning of the hole of the part (Fig. 4, c); non-circularity Δ, as the difference of the minimum and maximum diameters in one section (Fig. 4, d); deviations AD from the nominal value of the average diameter of the machined portion of the part (Fig. 4, d); the deviation of the lengths of the parts ΔI from the length adjusted by the stop (Fig. 4, e).
Non-roundness, delimitation, deviations of diameters and lengths of parts from nominal (Fig. 4, c) with an increase in the clamping base b decreases, and the moment of scrolling Mpr (fig. 4, a) and the rigidity j (fig. 4, b) increase. With an increase in the base by 4 times (from 10 mm to 40 mm), the non-circularity of parts decreases 6 times, while the rigidity of fixing the workpiece increases by 2 times (Fig. 4, b).
With a further increase in the clamping base, the roundness remains constant (Fig. 4, d), since the rigidity increases slightly (from 26 to 28 kN/mm). The delimitation of Δ and the deviations of Δ l details are halved. When the clamping base is small and the spindle speed is increased, the difference in the details increases. This is because when. At high frequencies of rotation, the bar bends under the action of centrifugal forces inside the spindle and, due to the insufficient rigidity of the securing section at a small clamping base, the beating of the outer end of the part becomes larger. When drilling, the drill leads away the more, the greater the frequency of rotation of the rod and its beating, and, consequently, the difference in thickness increases. As the clamping base increases, the difference in the number of parts for different bar rotation frequencies is about the same.
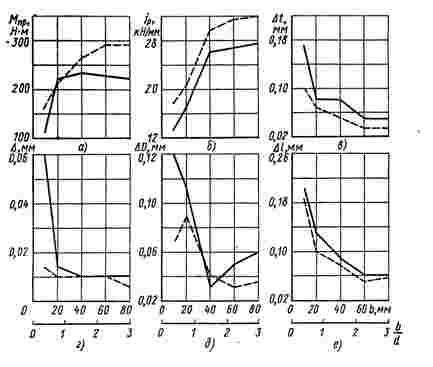
Fig. 4. The dependence of the accuracy of machining on the characteristics of the clamping mechanism: — p = 1.2 MPa; --- p = 2.0 MPa
Deviations of the length Δl of parts (Fig. 4, e) increase as the clamp base decreases. This is because with a small clamping base, the specific pressure on the bar increases, causing additional elastoplastic deformations, as a result of which the collet sponges slam into the bar more, the collet itself with the bar is additionally tightened into the spindle, and the pull-off of the bar increases.
With an increase in the number of petals of more than three, the clamping force is less dependent on deviations Δd of the bar diameter (Fig. 5, a); its magnitude increases as the losses due to the deformation of the petals decrease and the angle of contact between the sponge and the spindle decreases, which is very important when D = 0. The stability of the clamping rigidity increases with a decrease in the stiffness of the petals, which, with a certain collet length, can be achieved by increasing the number of cuts.
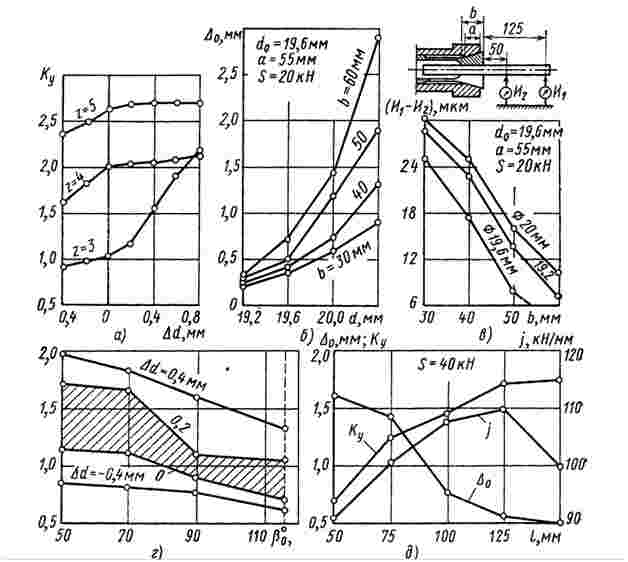
Fig. 5. Dependences of clamping characteristics on collet parameters.
The value of Δ0 (Fig. 5, b) of the workpiece in the collet chuck with the collet increases with increasing deviation of its diameter and, moreover, significantly with increasing the working part of the sponge b. At the same time, the radial beats Δ and the taper (the same difference between the readings of the beats) decrease (Fig. 5, c).
With an increase in the contact angle of 2β0 collet with spindle, the radial clamping force T∑ (or the gain Ky) decreases (Fig. 5, d) and, moreover, significantly for rods whose diameter is equal to or slightly larger than the diameter of the working hole of the collet (shaded area).
With an increase in the length of the petal, the force and rigidity of the clamp increase markedly and the amount of pulling of the rod decreases (Fig. 5). The length of the petal is advisable to exaggerate up to a certain limit, which, for example, for three-lobe collet, is about one and a half to two sponge lengths. With a greater length of the petal, you can clamp rods with large deviations of the diameter. Measurements of clamping stiffness / showed that with an increase in the length of the petal, the stiffness of the tightening collets first increases to a certain limit, and then begins to decrease. This is explained by a decrease in the resistance of the petals with a decrease in their rigidity when turning the workpiece in the collet as a result of the rotation of the jaws.
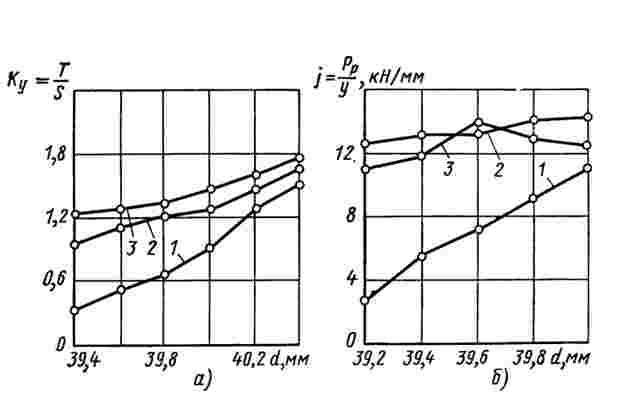
Fig. 6. Characteristics of the clamping of workpieces with a collet with various options for cutting the elastic part and the sponge:
1 – a collet with three lobes; 2 – collet with additional cuts; 3 – grip with six lobesTo investigate the effect of additional cuts, experiments were conducted with the collet to the 1A240-6 machine. By changing the shape and number of cuts, the force and stiffness characteristics of the collets were compared in three variants (Fig. 6). As the diameter d increases, the Qu gain and stiffness / increase, but the stiffness of the collet with additional cuts in the sponge (Fig. 6, b, curve 2) turned out to be more stable and higher, despite the fact that the Qu coefficient was slightly lower than that of six lobe collet (Fig. 6, a).
Perspective design
The design of the PC according to the patent of Ukraine No. 35950A is a cylindrical sleeve, in which, according to the standard (GOST 2877-80), the variant of interaction between the feed drive and the actuator (feed chuck) in the form of a metric thread is made – connecting part 1 (Fig. 7) . For guiding and centering, the cartridge is equipped with a guide strap 2. The remaining cylindrical part 3 has longitudinal cuts 4, which form elastic petals and working jaws with longitudinal 6 and transverse 5 cuts, creating an elastic hinge with a 0-0 conventional axis with different versions.
Preliminary mixing of the petals is made by the force applied to the sponge or the location of the conventional axis of the elastic hinge or slightly shifted towards the sealing of the petal (it is possible to flatten two forces attached to different sides of the conventional axis of the elastic hinge). Then this state of the feed collet is cured.
PC works as follows. When refueling the rod in the feed collet due to the elastic deformation of the petals, a force is clamped to the rod. This ensures the necessary grip strength. When changing the diameter of the rod, within the tolerance for it, or as the working hole is worn, the end of the elastic part of the petal adjacent to the elastic hinge rotates. However, due to a small redistribution of contact pressures along the length of the sponge, this rotation is compensated by the opposite directional rotation of the sponge in an elastic hinge.
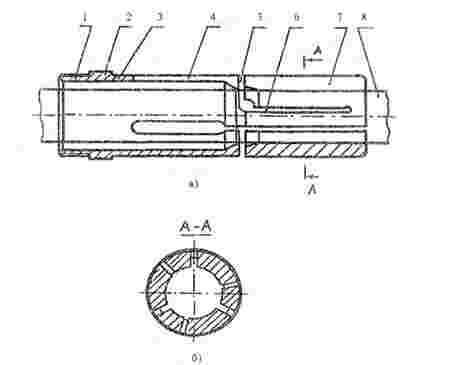
Fig. 7. The design of the feed collet with elastic hinge
This ensures that the position of the sponge is parallel to the surface of the bar when the diameter of the bar of wear of the working hole changes within certain limits. This makes it possible to reduce specific contact stresses in the sponge, stabilize the point of application of the resultant sipa applied to the sponge, in the place of the conventional axis of the elastic hinge, increase the evenly worn sponge length to 0.5 and more total length of the petal.
Conclusion
Thanks to the analysis, it is possible to predict the behavior of clamping characteristics from parameters such as: the accuracy of machining parts from the characteristics of the clamping mechanism, the power characteristics of the clamping mechanism from deviations of the workpiece diameter, rigidity and precision of the clamping from deviations of the workpiece diameter, which will further optimize and improve the performance clamping.
List of sources
- Абрамов Г. В. Влияние конструкции цангового механизма на усилие зажима заготовки. –
Станки и инструмент
, 1970 г. - Близнюк В. П. и Венгер Е. П. Упругие шайбы для точного центрирования и зажима деталей. –
Станки и инструмент
. - Болотин X. Л., Костромин Ф. П. Станочные приспособления. Изд. 5–е перераб. и доп. М.,
Машиностроение
, 1973 г. - Дальский А. М. Цанговые зажимные механизмы. М.,
Машиностроение
, 1966. - Корсаков В. С. Основы конструирования приспособлений в машиностроении. М.,
Машиностроение
. - Кузнецов Ю. Н. Расчет угла контакта зажимной цанги со шпинделем.–
Станки и инструмент
, 1970 г. - Кузнецов Ю. Н. Цанговый патрон. –
Бюллетень изобретений
, 1969 г. - Кузнецов Ю. Н. Жесткость зажима прутка в цанговом патроне. – В кн.: Металлорежущие станки, 1974 г.
- Кузнецов Ю. Н., Божко Я. В., Проскуряков К. Н. Передача сил в патроне с цилиндрической цангой. – В кн.: Технология и автоматизация машиностроения, 1974 г.
- Кузнецов Ю. Н., Орликов М. Л. Жесткость лепестков цанг. –
Станки и инструмент
, 1968 г. - Кузнецов Ю.Н.
Широкодиапазонные и многофункциональные зажимные механизмы: теория и практика
,Монография
, 2011 г.
- Абрамов Г. В. Влияние конструкции цангового механизма на усилие зажима заготовки. –
