
The
purpose of my master's work is
the rationale and development of the structure of the device for
measuring the thickness of the coating rolls in rolling mills (using
the ultrasonic method of measurement). To achieve this goal include the
following tasks in the work:
- a study of modern methods and technology of measuring the thickness
of the coating rolls in rolling mills;
- analysis of all the external variables that influence on the
measurement accuracy;
- creation of an algorithm measuring the thickness of the coating rolls
on the basis of the above-described research works;
- development of structure of ultrasonic thickness gauge of the coating
roll.
Nowadays,
work rolls, as an
instrument, of which depends on the performance of the rolling mill,
have a big influence on the quality of surface and profile rolled.
Rolls in the process of work wear out, and on their surface there are
microdefects, it is gradually erased. Developing, defects may lead to
splits or to the complete destruction of the roll.
In the conditions of cold rolling of metals (friction with slip)
numerous variables factors of external influence have a strong
influence on the working surface of the roller - pressure metal in
rolls, rolling speed, the coefficient of sliding friction, temperature
regime of the rolls, conditions of grease band and roll cooling,
conditions of strip tension in the rolling and so on [1]. Emergency
failure of rolls leads to very high costs (mill inaction for many
hours, defective rolling, equipment damage). The cost of the
high-chromium rolls is 30 - 40, and fast-cutting - 40 - 70 thousand
dollars.
The problem of the rapid depreciation of the working rolls caused the
need to control the strength of their surface layer due to the fact
that they are experiencing thermal shock and high alternating loads in
the process of rolling.
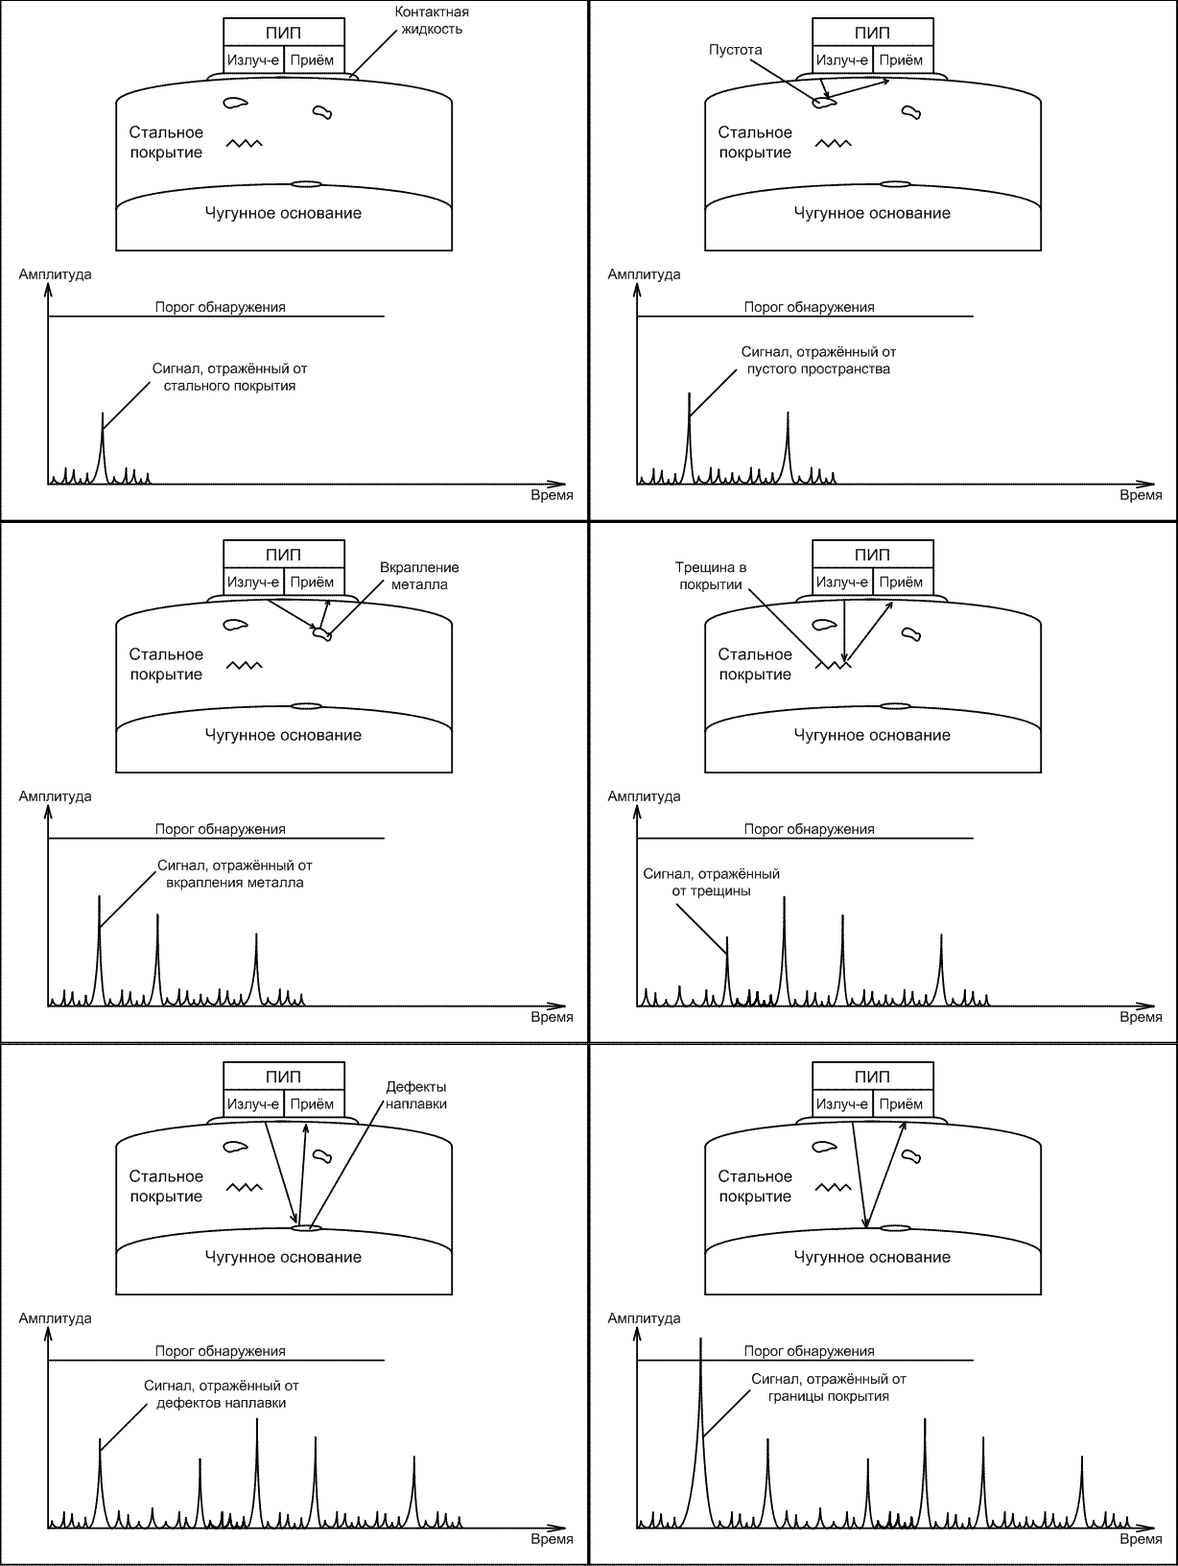
In the thickness gauge is proposed to use the method of ultrasonic echolocation. The principle of operation of the thickness gauge shown in Figure 1. Separately - combined ultrasonic piezoelectric transducer is used as a transmitter and receiver of acoustic signals. Ultrasonic transducer mounted on the workpiece surface. Surface beneath the contact is lubricated with liquid to provide acoustic contact. Ultrasonic thickness creates a powerful short electrical signal that arrives at the radiating piezoplate, which excites an acoustic probe pulse. This impulse extends deep into the coating, is reflected from the boundary of contact with the coating roller and back to the transmitter. Reception piezoelectric plate transducer converts the reflected acoustic pulse into electrical oscillations (bottom echo signal). Bottom echo signal arrives in thickness gauge, increasing the receiver to the amplitude required to detect the signal.

Figure 1 - Animation of the working principle of ultrasonic thickness gauge. Parameters of the GIF-animation: the number of frames - 6, the number of repeat cycles - 6; volume - 76 KB.
Delay measurement of bottom echo signal is carried out by transition
through zero. The device is equipped with a threshold discriminator for
the detection of the echo signal. If echo signal is more than the
threshold discriminator, the device begins to wait for signal passing
through zero. In this moment is fixed echo signal delay is necessary
for passage through the cover and back. The advantage of this method:
ensures high stability of readings thickness gauge, because the time of
signal transfer through zero does not depend on signal amplitude [2].
A central part of the device is the microprocessor, which is
responsible for most of the functions of management of other devices
and computation. Microprocessor mode is set by the operator with a
button keypad. State of the microprocessor, the results of calculations
are displayed on the indicator.
The microprocessor instructs the formation of the triggering pulse
generator of probing pulses (GPP) and launched simultaneously measuring
time intervals (MTI). GPP, in turn, forms the probe pulse that arrives
at the radiating piezoelectric plate of the primary measuring
transmitter. Bottom echo signal from the receiving piezoelectric
element acts on an input of the amplifier. Adopted by the transmitter
the echo pulse is amplified, and after the amplitude and time selection
normalized echo-pulse enters at the measuring time intervals.
Amplitude selection and formation of a normalized impulse, "tied" to
the characteristic point of the received signal, by means of the
comparator and DAC that is controlled by a microprocessor. Time
selection of the echo pulse is performed on a time selector using the
delay circuit, also managed by the microprocessor. Control law circuit
delay and DAC is determined by the microprocessor in accordance with
entered from the control panel settings TSC (time sensitivity control)
- the maximum value and the rate of decrease the level of limit
amplitude. The measurement of time intervals and the formation of
controllable delay by using the reference frequency generator (RFG).
Measured in MTI time interval is read the microprocessor to perform the
processing of measurement results and formation of the output
information [3].
1.
Валки прокатных станов / Под
ред. Полухина В.П.
– М.: Машиностроение, 1989. –
451 с.
2.
Руководство по эксплуатации, методика поверки
ультразвукового
толщиномера с памятью УТ9215 [Электронный ресурс]. – Режим
доступа: http://fpribor.ru/products/ut9215/ Дата обращения: 05.04.2011.
3. Толщиномер
ультразвуковой «ВЗЛЁТ УТ».
Руководство
по эксплуатации [Электронный
ресурс].
– http://vzljot.com.ua/files/9/re_ut_u.pdf Дата
обращения: 17.03.2011.
Important
note: when writing this master of the abstract work is not completed
yet. Final completion: December 2011. Full text of the work and
materials on the subject can be obtained from the author or his manager
after that date.